French apple cake

I mentioned this cake in passing ONE YEAR ago (!) in one of my update posts. I had baked the first test batch back in autumn of 2023 in preparation for a demo session I did at an assisted living facility - it was a big hit. I’ve made it several times since and added it to my to-do list for the blog. Well here goes! Plus, you’ll have time to make it for your own New Year’s celebration!

Inspired by a recipe in Aleksandra Crapanzano’s book “Gateau”, I did some quick research and found a number of recipes for this rum scented classic French cake. While AC’s ups the ante a bit with adding rum soaked raisins to the batter along with the apples, the bulk of recipes on line follow a simpler approach.

When I did my stages in 2007 at Pâtisserie Pascal Pinaud in Paris’s 5th arr., Golden Delicious apples were the go to for apple tartelettes and apple cakes. They have a lovely flavor and hold up well when baked without getting all mushy. I still like using them but also find Fuji, Granny Smith and Jonagolds great for baking. Of course, one can play around with a mixture of favorites too!

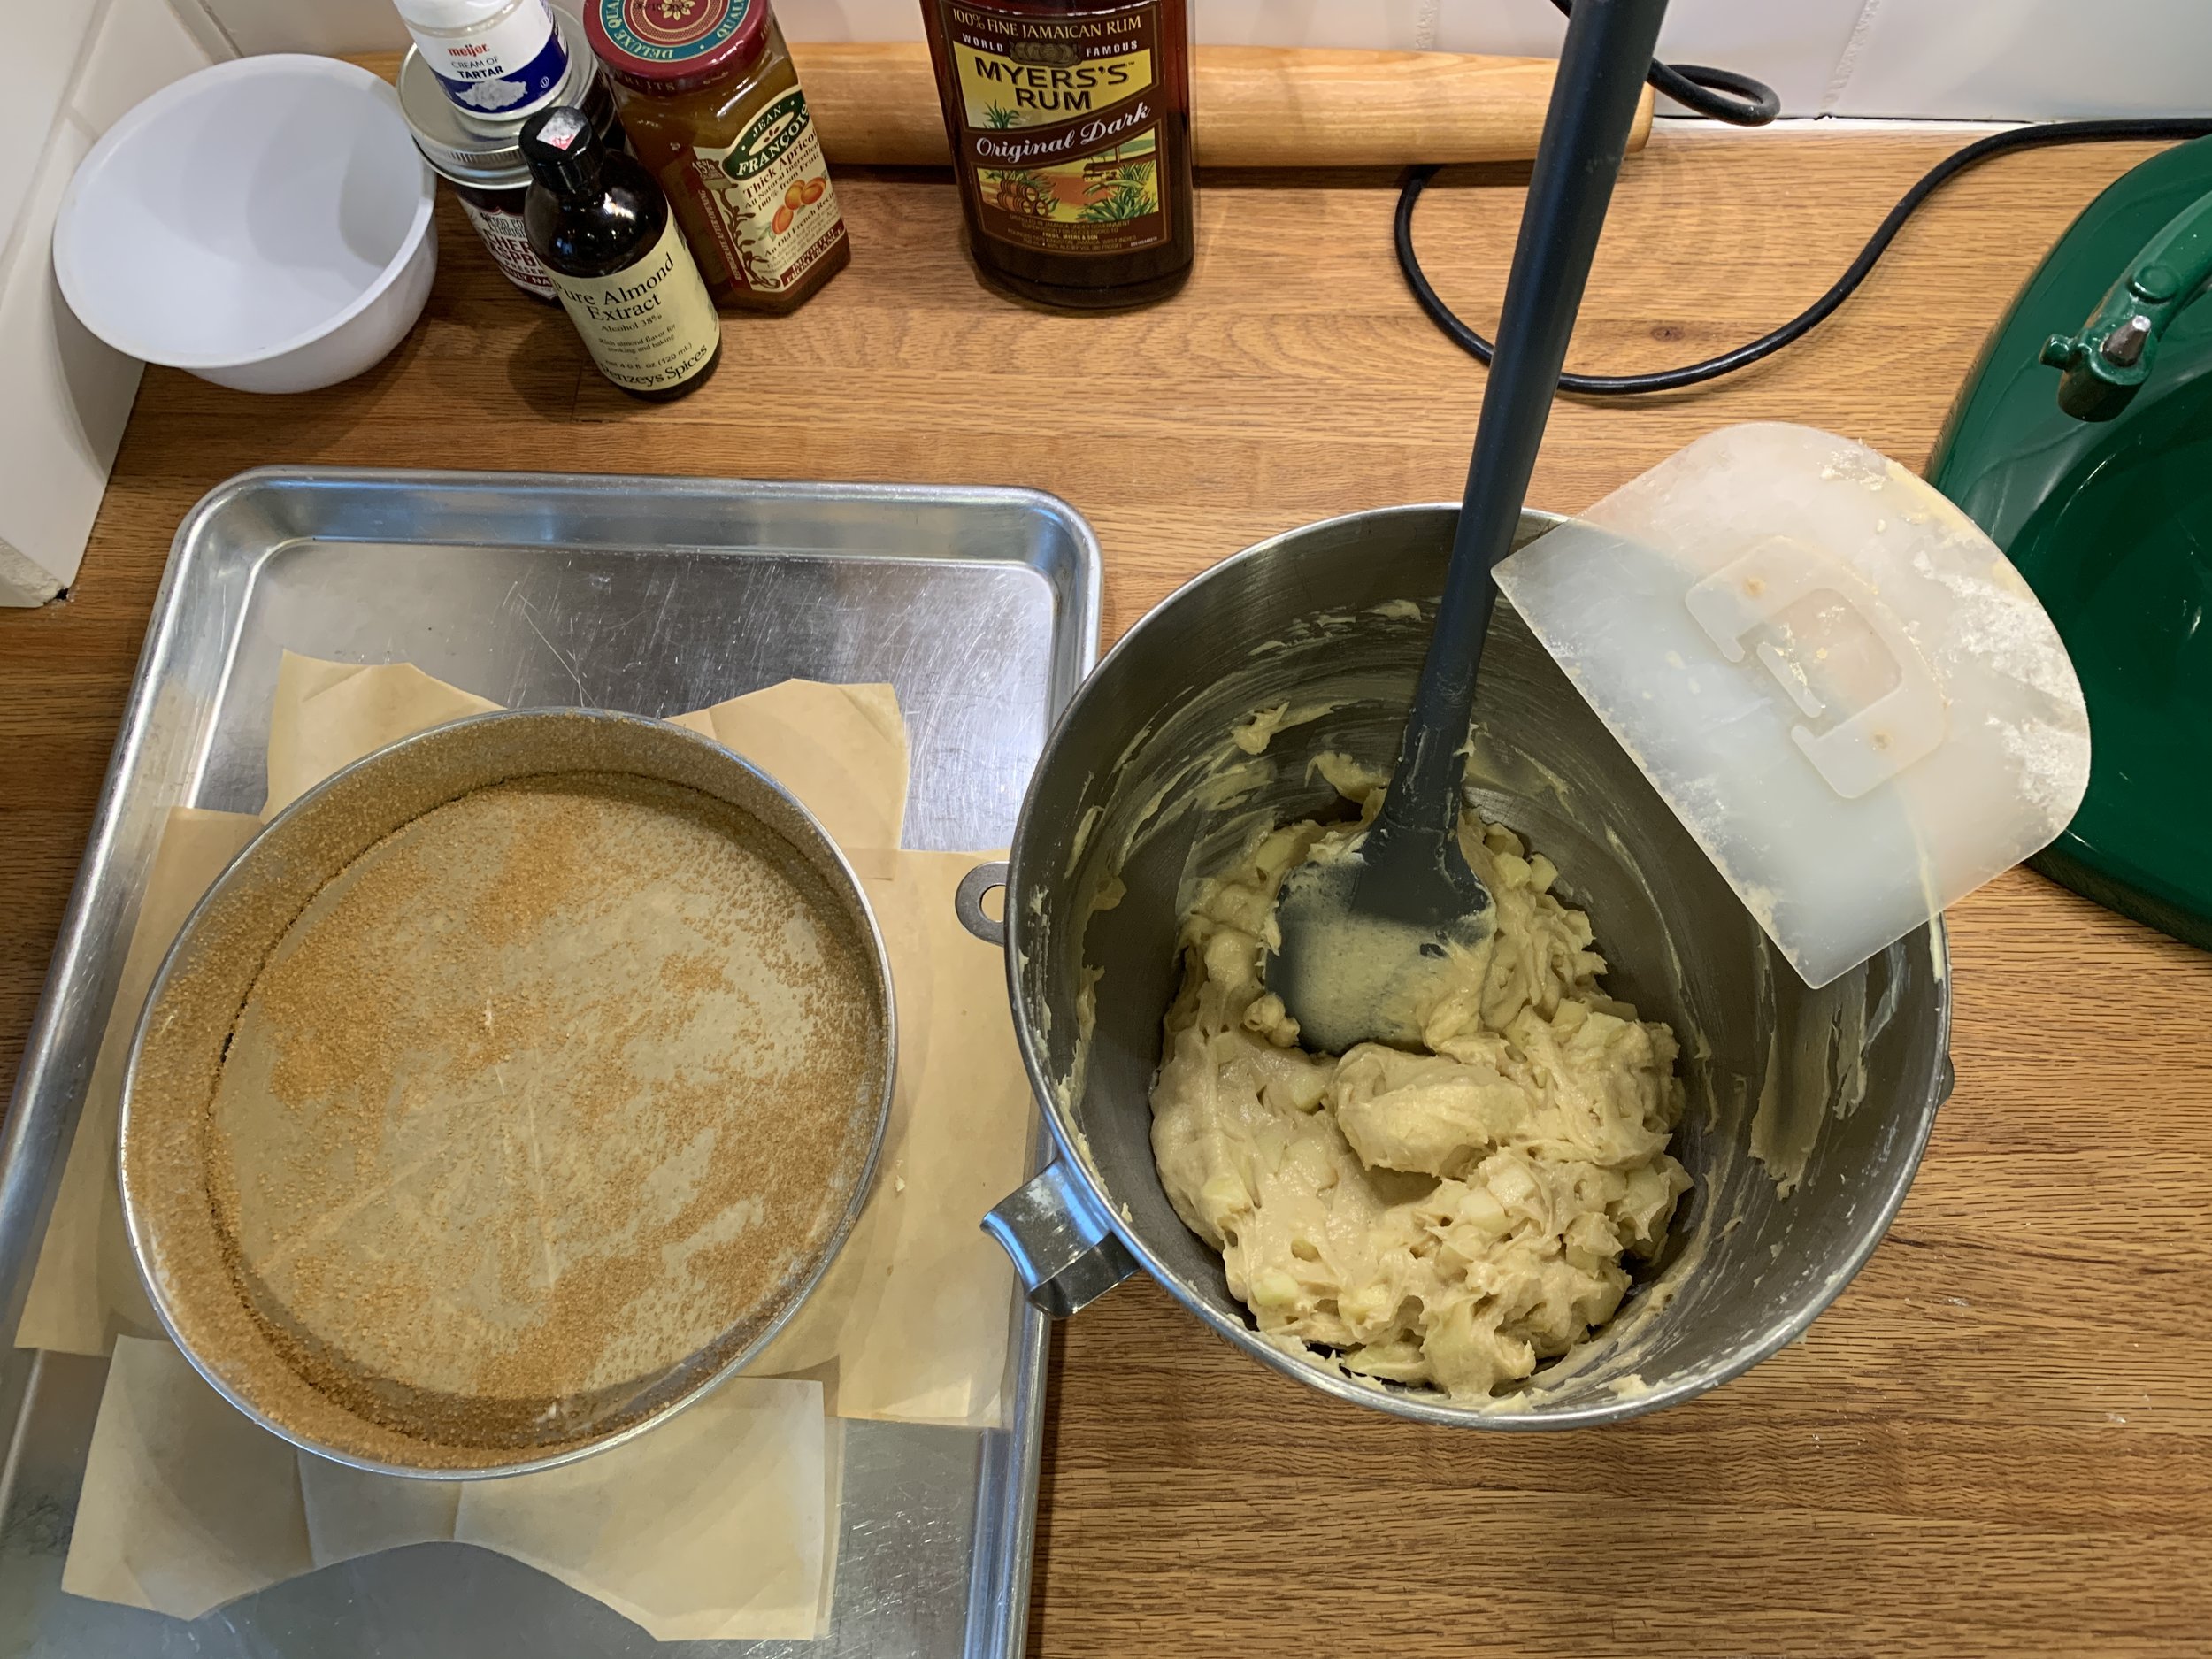
I’ve made the base recipe in a 9” cake pan, two 6” cake pans and silicone muffin type molds (using molds with 3 ounce/85 g wells yields about 14 cakes). Silicone molds don’t require buttering but the pans should be buttered and lined with parchment - I like to butter the parchment and inner sides of the pan and dust with raw sugar. It gives the outer edges a nice hint of crunch. Below is a nine inch pan ready to go.

I add a couple of my favorite spices (coriander and nutmeg) to the batter and dot the top with diced butter and raw sugar sprinkle early in the bake.

Here’s my recipe. Eggs and butter should be at room temperature. In the foreground of the photo below is organic golden cane sugar, a Costco find that I’ve been using as my “house” sugar for awhile now. On the right are my diced butter and raw sugar for the top.

mise en place

I probably sound like a broken record, but the process here is very much like many cake recipes out there. Here’s the recipe again.

Prep your pan. Heat the oven to 350ºF.

Peel, core and cut apples into 1/2” cubes.

In a separate medium bowl, whisk together 130 g / 1 cup all purpose flour, 1 teaspoon baking powder, 1/2 teaspoon ground coriander, a few grates of fresh nutmeg and 1/4 teaspoon kosher salt.

In the bowl of a stand mixer with paddle attachment cream 113 g / 4 ounces unsalted butter and 130 g / 2/3 cup cane sugar on medium high about three minutes until light and fluffy.

Blend in the eggs, one at a time, scraping the bowl down after each addition. Blend in 1 teaspoon vanilla extract and 45 ml / 3 tablespoons dark rum.

Add dry ingredients and mix until just combined. Fold in apples.

Ready to pan up!

Transfer batter into your prepared pan and level the top. Lots of apple chunks goin’ on!


Bake for 10 minutes then remove from the oven and top with diced butter and raw sugar.


Place back into the oven and bake another 30 minutes, checking half way through and rotating the pan 180º. Look for a golden top and a tester coming out clean.

Looks good (and smells good too!)

Let the cake cool in the pan 10-15 minutes before gently turning out onto a cooling grid. If you’re using a springform pan or a removable bottom cake pan like the one above, it’s very easy to release the cake. You can then let it fully cool resting on the pan bottom. Then, once cooled, carefully slide an offset spatula under the cake to separate it from the parchment and place on your desired platter for serving.

I made this for a Thanksgiving family gathering so for transport (and to give it a hint of decor) I set it on a doily topped cardboard cake round and stashed it in a covered cake carrier for the road trip. Simple.


To snazz it up a bit I went with my favorite whipped mascarpone topping, dolloped on and spread into swirls. Whip 56 g / 2 ounces mascarpone with 4 ounces / 1/2 cup heavy cream, a teaspoon of vanilla and 2 tablespoons (or to taste) of either confectioners sugar or caramel (my preference here - so good with apple desserts).


A sprinkle of oat crumble sets it off.

Hmmmm . . . good!

As mentioned earlier, I’ve also made these in silicone muffin style molds. I’m a big fan of the mascarpone/oat crumble garnish!

The recipe also works well in two 6” cake pans. If you’re serving just a few people, you can freeze one of them for later. Not a bad deal.

You still have time to make this for your New Year’s Eve or New Year’s Day gathering so get into that kitchen of yours and go for it!

Here’s to new adventures in baking and in life for 2025!

French Tarte Faves (FTF) No. 3: dacquoise

Here I am, back with another favorite - dacquoise in all it’s glory. I’ll warn you - this one’s kind of a mouthful with various components, assembly steps etc. But the end result is deelish! And it’s a great make-ahead project.

Dacquoise is a nut meringue made in a similar fashion to the ever popular French macaron. While very versatile for creating all manner of assembled desserts, it’s also delicious baked into petite button-like cookies that can be sandwiched or simply left alone. In fact, the term dacquoise can refer to the meringue base itself OR the assembled/layered dessert.

Here are a few posts on past creations: pistachio berry dacquoise; hazelnut dacquoise tarte; chocolate hazelnut marjolaine; vanilla/chocolate dacquoise.

This time I went with a passion/raspberry/pistachio flavor profile, feeling the dessert would be a good palate refresher after an Asian meal that Steve prepared recently for a group of friends. The idea actually goes way back to my Gracie’s days when I came up with a dacquoise/passion cream/raspberry number for the dessert menu. I won’t even begin to tell you how fussy that assembly was, but, boy oh boy, it was delicious!


The nut meringue dacquoise component is frequently made with almond flour but you can substitute in hazelnut or pistachio flour (or a mix of your favorite ground nuts). This time around I used half blanched almond flour and half ground pistachios.

Plan aheads are: bake the dacquoise a few days ahead/hold in the freezer until ready for assembly; make passion fruit curd and raspberry coulis a day or two before/hold in the fridge; make a basic crumble and hold in the freezer (or use some of your freezer stash); on assembly day whip heavy cream to fold into the passion curd. NOTE: once assembled you can freeze the whole shebang (except for last minute garnishes) too!

Here are the ingredients for the dacquoise base: almond flour, ground pistachios and confectioner’s sugar sifted into the bowl left/front. Then simply whip the egg whites with a pinch of salt until foamy, then gradually add the sugar. Once all the sugar is added, increase the mixer speed and whip to stiff peaks.

Dacquoise mise

Nice Stiff peaks

Blend the nut flour/confectioner sugar mix into the whipped whites in three additions then pipe your desired shapes.

I planned to assemble this in my mom’s longer, narrower Mirro loaf pan so I use the pan as a guide, placing it on Silpat and dusting over it with confectioner’s sugar to give myself an outline for piping my dacquoise shapes. I know I’ve shown you this trick before - it’s pretty slick.


I ended up with two rectangles plus a number of cookies for garnish.

Piped and unbaked

Once the dacquoise is baked at 350ºF for about 20 minutes, let it cool then gently release from the Silpat with a small offset spatula. You can freeze the pieces now if you’re not ready for assembly yet.

Next up: passion curd. Through Amazon I ordered Funkin brand passion fruit purée (reportedly popular with bartenders for making cocktails). It stores at cool room temperature - as long as it’s unopened, shelf life is great. Once opened, refrigerate it and use within 10 days. I only needed a portion of the total amount so I poured the extra into ice cube trays and froze them for future use. I do that with freshly squeezed lemon juice too.

Passion curd mise en place

Whisk 2 large eggs and 4 large yolks in a medium bowl and set aside. In a medium saucepan heat 150 ml / 1/2 cup+2 tablespoons passion purée with 45 ml / 3 tablespoons lemon juice and 150 g / 3/4 cup granulated sugar (I’m using a golden organic cane sugar here). Temper half of the passion mixture into the eggs then return all to the saucepan and cook stirring constantly over low heat until thickened and a couple of bubbles appear (165º-180º).

Remove the saucepan from the heat and whisk in 140 g / 10 tablespoons cubed, room temperature unsalted butter. Using an immersion blender makes for a nice creamy end result. Transfer to a clean bowl, cover the surface with plastic wrap, let cool briefly at room temperature then refrigerate. This keeps in the fridge for up to a week and can be frozen. Here’s the recipe again


The curd recipe makes about 2.5 cups. I needed 360 g / 1.5 cups for this project so I froze the rest.

I often have different berry and other fruit purées in my freezer as well as whole raspberries and blueberries from summer crops. If you happen to have raspberry purée on hand, by all means use it. Otherwise thaw a couple pints of raspberries (or use fresh), smush them and strain out the seeds and add ~10% sugar to the purée to create a coulis. I used 120 g of purée set with 1/2 sheet of gelatin for the middle layer of my assembly. I saved the remaining coulis for garnishing and, if you have any of that left, freeze it for later. You’ll be ready for next time.

Let’s assemble!! Lightly oil or butter the insides of a loaf pan then line it with plastic wrap wide enough to have some hanging over the rim. Press one dacquoise rectangle gently into the bottom of the pan. You may have to trim edges a bit.


Whip 200 g heavy cream, blend it into the 1.5 cups of curd and set the blend by whisking in 1.5 sheets of bloomed, strained and squeezed out gelatin, creating a bavorois.


Use about half of that to cover the bottom dacquoise layer. Let the remainder rest in the fridge.

Pop the whole pan in the freezer for about 20 minutes to set before covering with the coulis.


Pour the coulis over passion cream and once again place the whole thing in the freezer to set.


Next I topped the berry layer with some pistachio olive oil shortbread crumbs that I had in my freezer. I had made the cookies a while ago and found them tasty but very crumbly so . . . . into the freezer they went for such an occasion as this!


Now carefully cover the crumbs with the remaining passion cream and smooth the top. Place in the freezer to set.


Finally place the second dacquoise rectangle on the top. Fold the plastic wrap edges up over the top and freeze the entire pan. I fully assembled this some days before the dinner event to make the day-of super easy. Plan ahead - my favorite mantra!


On the day you plan to serve, transfer the pan from the freezer to the fridge about 4 hours ahead. A couple of hours later, have a platter or even a simple cutting board at the ready. Gently lift the whole thing from the pan by the plastic wrap edges while it’s still semi-frozen without being rock hard. I find a warm, wet cloth wiped along the outsides of the pan helps it release more easily. Place it on the platter or cutting board, pulling the plastic away from the sides.

Hold it in the fridge where it will continue to thaw but remain cold. It should hold it’s shape.

When ready to serve, slice with a sharp knife (8 slices worked well here), plate and top with a dollop of whipped cream, some raspberry coulis, a few fresh raspberries and a petite dacquoise cookie. Yum.

All plated up

The new year is almost upon us. Take care of yourselves.

Caramel biscuit slices

Hi all! Christmas week is upon us, the winter solstice has passed by and now we can look forward to lengthening daylight in the coming weeks. I love it when the end of January creeps up on us and we realize “Wow it’s not getting dark at 5 pm any more!”

I’m easing back into life and want to share these delicious cookies with you. This Scandinavian recipe is compliments of Brontë Aurell’s book “Brontë at Home - baking from the Scandi Kitchen”. The word biscuit is used in Great Britain and Northern Europe for what we Americans think of as cookies. Tea and biscuits anyone?

One of this recipe’s ingredients is golden syrup which is made from cane sugar. Buuuut . . . . for my trial run I used honey since I didn’t have any of said golden syrup in my larder. That first batch of biscuit slices was a big hit, much enjoyed by those who were around to accept the role of samplers.

I ultimately got my hands on a couple of bottles of Lyle’s Golden Syrup, a brand that’s been around a long time and an ingredient that I often see in baking recipes from the Brits and “Scandis”. Made by the British company Tate and Lyle, the story began in 1881 when businessman Abram Lyle built a sugar refinery on the Thames in East London. The golden syrup was a by product of refining sugar cane to create sugar. He started selling it from wooden casks and was soon supplying large quantities to London businesses weekly.

It’s an inverted sugar syrup, the golden end result adding caramel (almost on the verge of being burnt, in a good way) and honey notes to baked goods. It can also withstand higher baking temperatures and helps prevent crystallization.


On to the task at hand! Making the dough is a straight forward process, As a plan ahead step, I like getting it shaped into planks then wrap and fridge (or freeze) them until I’m ready to bake.

Here’s the recipe. For general baking I use unsalted butter such as Challenge or Land O’Lakes, but for cookies I’ve been experimenting with European style butters which contain a higher amount of butter fat. There are a number that I can find locally - Land O’Lakes Extra Creamy (salted or unsalted, black box), Vermont Creamery (salted or unsalted), Danish Creamery (salted - made by Challenge), Kerry Gold (salted and unsalted). So far I’m enjoying the flavors in the cookies I’ve baked with the salted versions, finding that the salt adds a certain je ne sais quoi. If you opt to use salted butter in a recipe that includes salt as an ingredient, simply reduce the recipe amount by half.


I often replace a quarter to a third of a recipe’s all purpose flour with whole wheat pastry flour, (WWPF) particularly in my shortbread cookies and pâte brisée. Pastry flour is softer with less gluten than all purpose, giving a more tender end result. Plus I like the flavor the whole wheat imparts.

Buuuuuuuut! This year I had a hard time finding Bob’s Red Mill WWPF which is the one I’ve been using for some years now. Luckily I found some at a local specialty market here in Grand Rapids, but sadly I’ve just learned that all of Bob’s pastry flours have been discontinued. Oh man!

Mise en place (FYI - my mise here is for a larger batch of dough than the base recipe)

The dough process is a familiar one - cream butter and sugar (lately I’ve been using golden granulated cane sugar from Costco); add in golden syrup (or honey) and vanilla and blend; mix in flour and baking powder until it all comes together. Here’s the recipe again.

Once the dough comes together, divide it in three portions about 215 g each. To create the dough strips I place them on plastic wrap and get a rough shape going. You’re looking for a final sized strip of approximately 2” wide by 14” long for each portion of dough. Of course you can play around with size variations - I’ve done some where I cut the strips in half lengthwise for nice mini bites. Yummy.


Fold the plastic wrap up around the pre-shaped dough, leaving a bit of room for rolling it to it’s final dimensions. At this point you can proceed with baking or stash your strips in the fridge or freezer for later.


When ready to bake, heat the oven to 350º and place two strips on a half sheet pan. Sprinkle flaky sea salt on top.


Bake about 8-10 minutes - you might need a few minutes more. You’re looking for the dough to appear set and golden in color. Remember every oven is different.

Pull the sheet pan and drizzle caramel in squiggles across the surface. Pop the sheet pan back in the oven for 3-4 minutes to set the caramel. Top with finely chopped blanched almonds and pearl sugar if you’d like. I’ve been keeping most of my batches pristine with caramel and sea salt. So good!

Let the strips cool on the sheet pan for 5-10 minutes, then cut into slanted strips with a sharp knife or pizza cutter. I gently push them apart with a small offset spatula and let them cool fully before enjoying.

They store well in a covered container for several days at room temp or in the freezer for several weeks. Simply take them out and place at room temperature for 20-30 minutes before enjoying.

Chopped almond/pearl sugar version

I made these for several demo sessions I did for a local seniors group and they were a big hit. Below is a holiday cookie trio of these slices along with ricciarelli (delicious Italian almond meringues) and diamant au chocolat (classic French sablés).


Here’s a plate of the mini versions. One or two are simply perfect with my afternoon cup of coffee.

Give these a try - you’ll love them!

Wishing all of you a very Merry Christmas, peace, calm and all things bright.

Holiday Light show at nearby Meijer Gardens after a snowfall; Photo courtesy of Connie B.