Now here's an interesting one - roasted banana ice cream

When I first read this recipe in the book the new sugar and spice, I thought - wow!  What a great way to use up ripe bananas.

It sounded intriguing so I went for it.

We had a bunch of bananas sitting around, not getting any younger, so I peeled them, broke them up and froze them in a ziploc bag until I was ready.


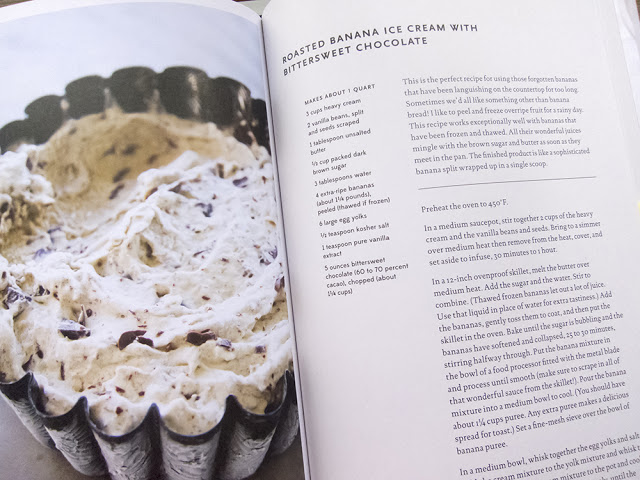
The ice cream base is pretty standard, using cream, sugar and egg yolks, although the sugar comes in at the banana roasting stage rather than during the making of the crème anglaise.

Whereas the recipe calls for 3 cups of heavy cream for the dairy, I used whole milk for one of the cups.  I decided to follow the standard formula in a David Lebovitz recipe that I've been using for years and has always turned out well.

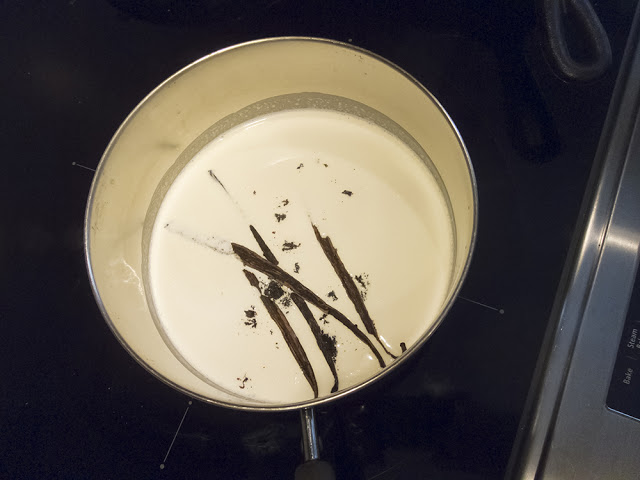
The first step is to heat 2 cups of the dairy with 2 scraped vanilla beans (seeds and pods) and let it steep for an hour or so.


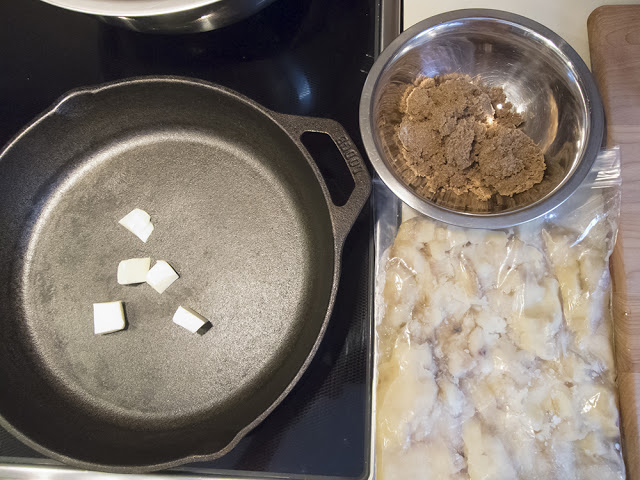
Then in an ovenproof skillet, melt 1 tablespoon unsalted butter, add 100 grams dark brown sugar and 3 tablespoons water. My bananas had been frozen, so during the thaw some juice was created which I used in place of some of the water (Samantha's tip!).

getting ready
Add the bananas and toss them to coat . . . .


then put the skillet in a preheated 450º oven.

Bake the bananas until bubbling and the bananas have broken down.

after the oven
Then purée the roasted bananas (I used a blender) and put them in a medium bowl to cool.  Place a strainer over the banana bowl.

Now this is where I became a tad concerned.  The puréed mixture looked absolutely awful and totally unappealing.

oh my!

But not to be swayed I was determined to see this through.  My hope was that once the purée was mixed into the ice cream base and processed, it would lighten up and not have such a dirty, ugly brown color!

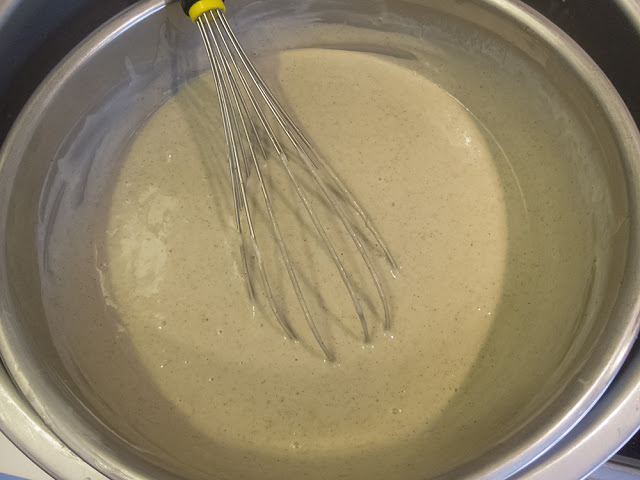
Turning back to the ice cream base, I put 6 large egg yolks in a bowl along with 1/2 teaspoon of salt, poured a portion of the warm vanilla bean infused dairy over the yolks, whisking away.  The mixture is then returned to the heat and cooked while stirring until just thick enough to coat the back of a spoon.  I took it to about 82ºC.

Strain the mixture into the bowl containing the banana puree and whisk in 1 teaspoon of vanilla extract and the third cup of dairy.

Cool this over on ice bath, whisking periodically.

phew! looks better already
Chill the base in the fridge over night.

When you're ready to process the base, have 142 grams/5 oz bittersweet chocolate chopped and ready to go.


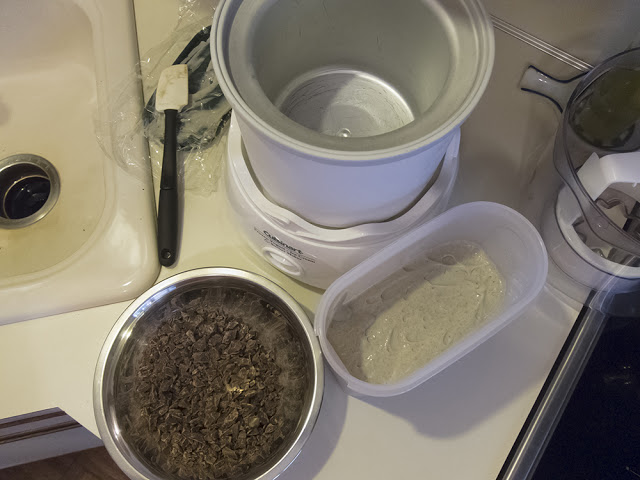
ready to start churning
At the end of processing add in the chopped chocolate to blend.

looking pretty good
Put the ice cream in a container and freeze until firm (I usually do this a day or two ahead of when I plan to serve it).  Place plastic wrap directly on the surface of the ice cream to prevent crystallization during freezer storage.

The final product looked just fine and tasted good too.  My only complaint was it seemed a bit icy and not as creamy as I would have liked.

Perhaps the fact that I replaced one cup of cream in the recipe with whole milk, in addition to the moisture in the banana puree, was enough to create the icier texture.

Steve had NO problem with it, but then he's a sucker for ice cream in any way, shape or form!


Pistachio and chocolate butter cake from Samantha Seneviratne

A post holiday gift to myself was the book the new sugar and spice - A RECIPE FOR BOLDER BAKING by Samantha Seneviratne.

Many of the recipes have caught my eye.  My first trial from the book, coffee cardamom shortbread, was a definite success.

Next up is the cover recipe for pistachio and chocolate butter cake, highlighting the use of pistachio paste, cardamom and chocolate chunks (and butter, of course).


The butter, eggs and milk should be at room temperature.

Butter a 9" springform pan and heat the oven to 350º.

Do your ingredient mise en place . . . .

les ingredients
and let's go!

Whisk 223 grams flour, 7 grams baking powder, one teaspoon freshly ground cardamom (hard to see, but it's there on the left side in with the flour) and 1/2 teaspoon salt in a medium bowl.

Cream 113 grams/1 stick room temperature, unsalted butter with 75 grams granulated sugar with an electric mixer on medium speed until light and fluffy.

Add two eggs, one at a time, then blend in 198 grams pistachio paste.

Add the flour mixture alternately with 120 ml milk in three additions, beginning and ending with the flour.

Fold in 85 grams chopped dark chocolate (I used a mixture of 56% and 72%).

Put the batter into the springform pan and smooth.  Sprinkle 35 grams coarsely chopped pistachos over the top.

A very straight forward cake batter preparation.

ready for the oven

Bake for about 30-40 minutes.

just out of the oven

How did this work out?  Well, this is one case where it's important to pay attention to what's going on in your oven.

I baked this for a good 50-55 minutes since the center was still loose after the first 30-40 minutes.

At that point all the signs of doneness were there - a tester inserted in the center came out with moist crumbs, the top was nicely browned, there was no central jiggling when I lightly shook the pan, and it felt firm in the center.  Plus the aroma was enticing!

BUT!  Once this cake cooled it sank significantly in the middle and was still not thoroughly baked through in the center.  Disappointing.  You pay attention, you think it's done, but then . . . .

Perhaps the fact that my springform pan was sitting on an insulated cookie sheet kept the oven heat from getting properly into the center - who knows!

However, all was not lost.  I simply cut out the center goo, sliced the cake and served it with Samantha's roasted banana ice cream (see my next post!).  Pretty tasty indeed.

The cake is dense and buttery with a lovely cardamom-pistachio-chocolate thing going on.

If I were to do this recipe again, I would bake the cake in small flexi-molds or individual cake pans.  The baking time would be less, and the smaller portions would bake through more evenly.

Live and learn.  That's what it's all about.


Lemon-lime tart

As I mentioned in a recent post on fresh fruit tarts, I had a blind-baked pâte brisée shell in my freezer just waiting to be filled. I was thinking lemon.

Before the Christmas holidays I had purchased a bunch of Meyer lemons, regular lemons and limes to use as table decor as well as to have on hand for baking. Since I had way more fruit on hand than I would use up efficiently, I proceeded to zest it, freeze the zest, juice the whole lot and freeze the juice too. Always on the prowl for the perfect lemon tart, I tried to track down the recipe for Jacques Genin's famous tarte au citron. I found a couple of recipe versions online as well as a video of Jacques himself preparing said tarte.  Unfortunately the video did NOT include the specific ingredient portions.  Oh well.

Update! I subsequently got my hands on his book on lemon tarts compliments of a student who was in one of my classes at Sur La Table. It’s small, in French and includes many versions of citrus tart. It’s great! But alas very difficult to get one’s hands on in the USA.

While his tart is made with limes, I opted for a lemon-lime combo. I already had my blind-baked crust. NOTE: here’s a link to two of my favorite tartes au citron, including Genin’s version.

The lemon-lime filling is made with 3 large eggs, 170 grams sugar, 180 ml juice (half lemon, half lime for me), zest of 6 fruits (Meyer lemon, lemon and lime combo for me) and 200 grams butter.

Whisk the eggs and sugar in a saucepan, add the zest and juice and cook over medium heat, whisking constantly until the mixture starts to thicken and is just short of boiling (I took it to ~83º C).  You should start seeing fine little bubbles forming around the edges and steam starting to rise up.

Remove it from the heat and blend the butter in with an immersion blender until smooth and creamy.

Since my crust had been in the freezer, I took it out about 30 minutes ahead and warmed it in a 325ºF oven for about 5 minutes.

One approach to a lemon tart is to make the curd, chill it and then fill the blind baked shell with the already chilled curd. Then it goes back into the fridge for additional chilling. Another is to fill the shell with the warm curd, cover the surface with plastic wrap and put the whole thing in the fridge to chill. Even another is to fill the warm shell with the warm curd and put it in the oven at 300-325ºF for about 10 minutes to further "set " the filling.

That's what I did with this one.

before the oven

after the oven

Believe me - the number of ways to approach a lemon tart is as many as the number of lemon tart recipes you'll find out there.  Yes, it's true.  I've tried 'em all (almost).

Once the tart cooled to room temp, I popped it (covered) in the fridge overnight.

We taste tested it the following day as our luncheon dessert at cousin Jen Galloway's house in the woods.  Oh how creamy, tart and lemony it was.  And the pâte brisée crust was PERFECT with it.

Another winner!

Happy Valentine's Day and some puff pastry hearts


 Happy Valentines Day to one and all!


I recently gave a puff pastry presentation at OLLI (Osher Lifelong Learning Institute) at Aquinas College here in Grand Rapids MI.

talking the puff talk

As a prelude to Valentine's Day I simply had to include some puff pastry heart treats for the attendees.

I cut out some heart shaped vol au vent . . . 


and baked them up after egg washing and sprinkling them with vanilla sugar.


I filled them with swirls of whipped chocolate ganache . . . .


Et voila! A tasty treat!

Fresh fruit tarts in January

There's something so attractive about fresh fruits arranged on a layer of vanilla pastry cream, nestled in a lovely tart crust.  A feast for the eyes as well as the mouth.


Recently I received an order for a fresh fruit tart with a request for kiwi and berries.  Typically I use a 1-2-3  cookie-type dough (similar to shortbread dough in the ratio of sugar, butter and flour with some egg and vanilla added in).

But . . . . I had some pâte brisée dough in my freezer and decided to do a comparison between that and the usual 1-2-3.

I don't normally blind bake pâte brisée, but this time I lined 9" tart rings and smaller rings with each of the two doughs, primarily so I'd have something I could sample and compare.

Notice in the photo below how the pâte brisée edge is not as sharp and pristine.  It's an ongoing battle with that dough - trying to keep its shape, avoid shrinkage and have a nice looking end result.

Two things that help when working with pâte brisée are making sure the dough is nice and relaxed before lining the tart form and then freezing the dough in the form before baking.

Keep trying, right?


blind baked pâte brisée

small version of blind baked 1-2-3 dough

larger 1-2-3 version for the ordered tart

I filled the above shell with vanilla bean pastry cream lightened with a bit of whipped cream and topped with fruit.  As seen below on the left, I typically do a little fruit "practice" before placing it on the finished tart.

I added in some mango slivers to give a bit of contrasting color to the kiwi and berries.


getting ready for final assembly

et voila!

As for the smaller versions with the two different doughs, I just randomly topped the pastry cream with some of the fruit leftover from the order, not being concerned about the artistry.  I wanted to know how the two crusts compared taste wise.


the taste tester tarts

The left side is the 1-2-3 and the right the pâte brisée.

Somehow they were switched around for the "cut" pictures.


pâte brisée on left and 1-2-3 on right

While you can't really see a difference in the two doughs photographically, the taste experience was definitely one for comparison.  And to top it off, I stored these babies in the fridge for a day before we ate them.

Both were delicious, although Steve and I agreed that the pâte brisée taste and texture (crispy yet tender and oh so good) outshone the 1-2-3.  They both held up well after their refrigerator day - good to know when planning dessert.

Pâte brisée is now on my hit list of doughs to use for blind baked shells.  The 9 inch-er that I baked for this test went into the freezer for a couple of days after which I used it for a delicious lemon tart.

More on that later.

All in all an enjoyable comparison!


Kouign-amann pudding

Now here's a good one - essentially a bread pudding made with leftover Kouign-amann.  What?!


Of course some might argue that once Kouign-amann are made they'll be gobbled up and there won't BE any leftovers.

Not so in my case.  A couple of months ago I decided to make a batch of K-a, but, instead of baking them in open tart rings, I baked them in flexi-molds.  I thought it would lend itself to much easier release of the final baked goods from their sticky, caramelized holders.

Nuh-uh.  Because the dough was essentially "shielded" by the silicone molds, the K-a exteriors did not caramelize, the dough layers did not bake through and were pale and floppy.  It was a gooey mess.

Note to self: certain things bake and brown much better surrounded by metal.  Yup.

Some of the edges were actually OK and the flavor was there, so something wouldn't allow me to throw them all away and into the freezer they went.

After the holidays I was visiting Schuler Books here in Grand Rapids, looking of course at baking books, and was excited to find a recipe from Rose Levy Beranbaum's The Baking Bible (with Kouign-amann on the front cover no less) for "souffled French toast".

It uses day-old K-a baked in an egg, milk, cream, vanilla custard.  What's not to like.

I removed 480 grams of K-a from the freezer some hours ahead and let them thaw at room temperature.  Notice the misshapen K-a lumps in the photo below.


notice the doughy interior layers


Cut the K-a into cubes and place them in an 8"x8" glass baking dish.

Mix 6 large eggs, 160 ml heavy cream, 60 ml whole milk and 1 teaspoon vanilla extract.


Pour the custard over the K-a, cover and soak the mélange in the fridge over night.


ready for an overnight soak

Heat the oven to 350º F.  Bake covered with foil for 10 minutes, then remove foil and bake an additional 10 minutes or until the pudding is puffed, set and nicely browned.


We ate this for dessert au naturale, still slightly warm (when it's at its best, by the way).

I can just imagine it topped with a little chantilly cream, a drizzle of maple syrup and some fresh berries, either for dessert or for breakfast or brunch.  YUM.

So now you know what you can do with those leftover or not-so-perfect Kouign-amanns that you just might have lying around.

Thanks Rose.