Strawberry shortcake

IMG_4051.jpg

Recognizing the fleeting yet delicious strawberry season here in west Michigan I just had to share a little something with you on June’s quintessential summer dessert - strawberry shortcake.

IMG_4045.JPG

What a difference between the often gargantuan looking engineered strawberries that we get from California and the smaller, succulent and so tasty berries from our local growers. Oh my.

California vs. Michigan

California vs. Michigan

Whether you like yours assembled with a crumbly scone/shortcake/biscuit or a wedge of angel food or sponge cake, with lightly sweetened whipped cream or a scoop of chilly ice cream (think vanilla, strawberry or pistachio!), it’s definitely a seasonal favorite.

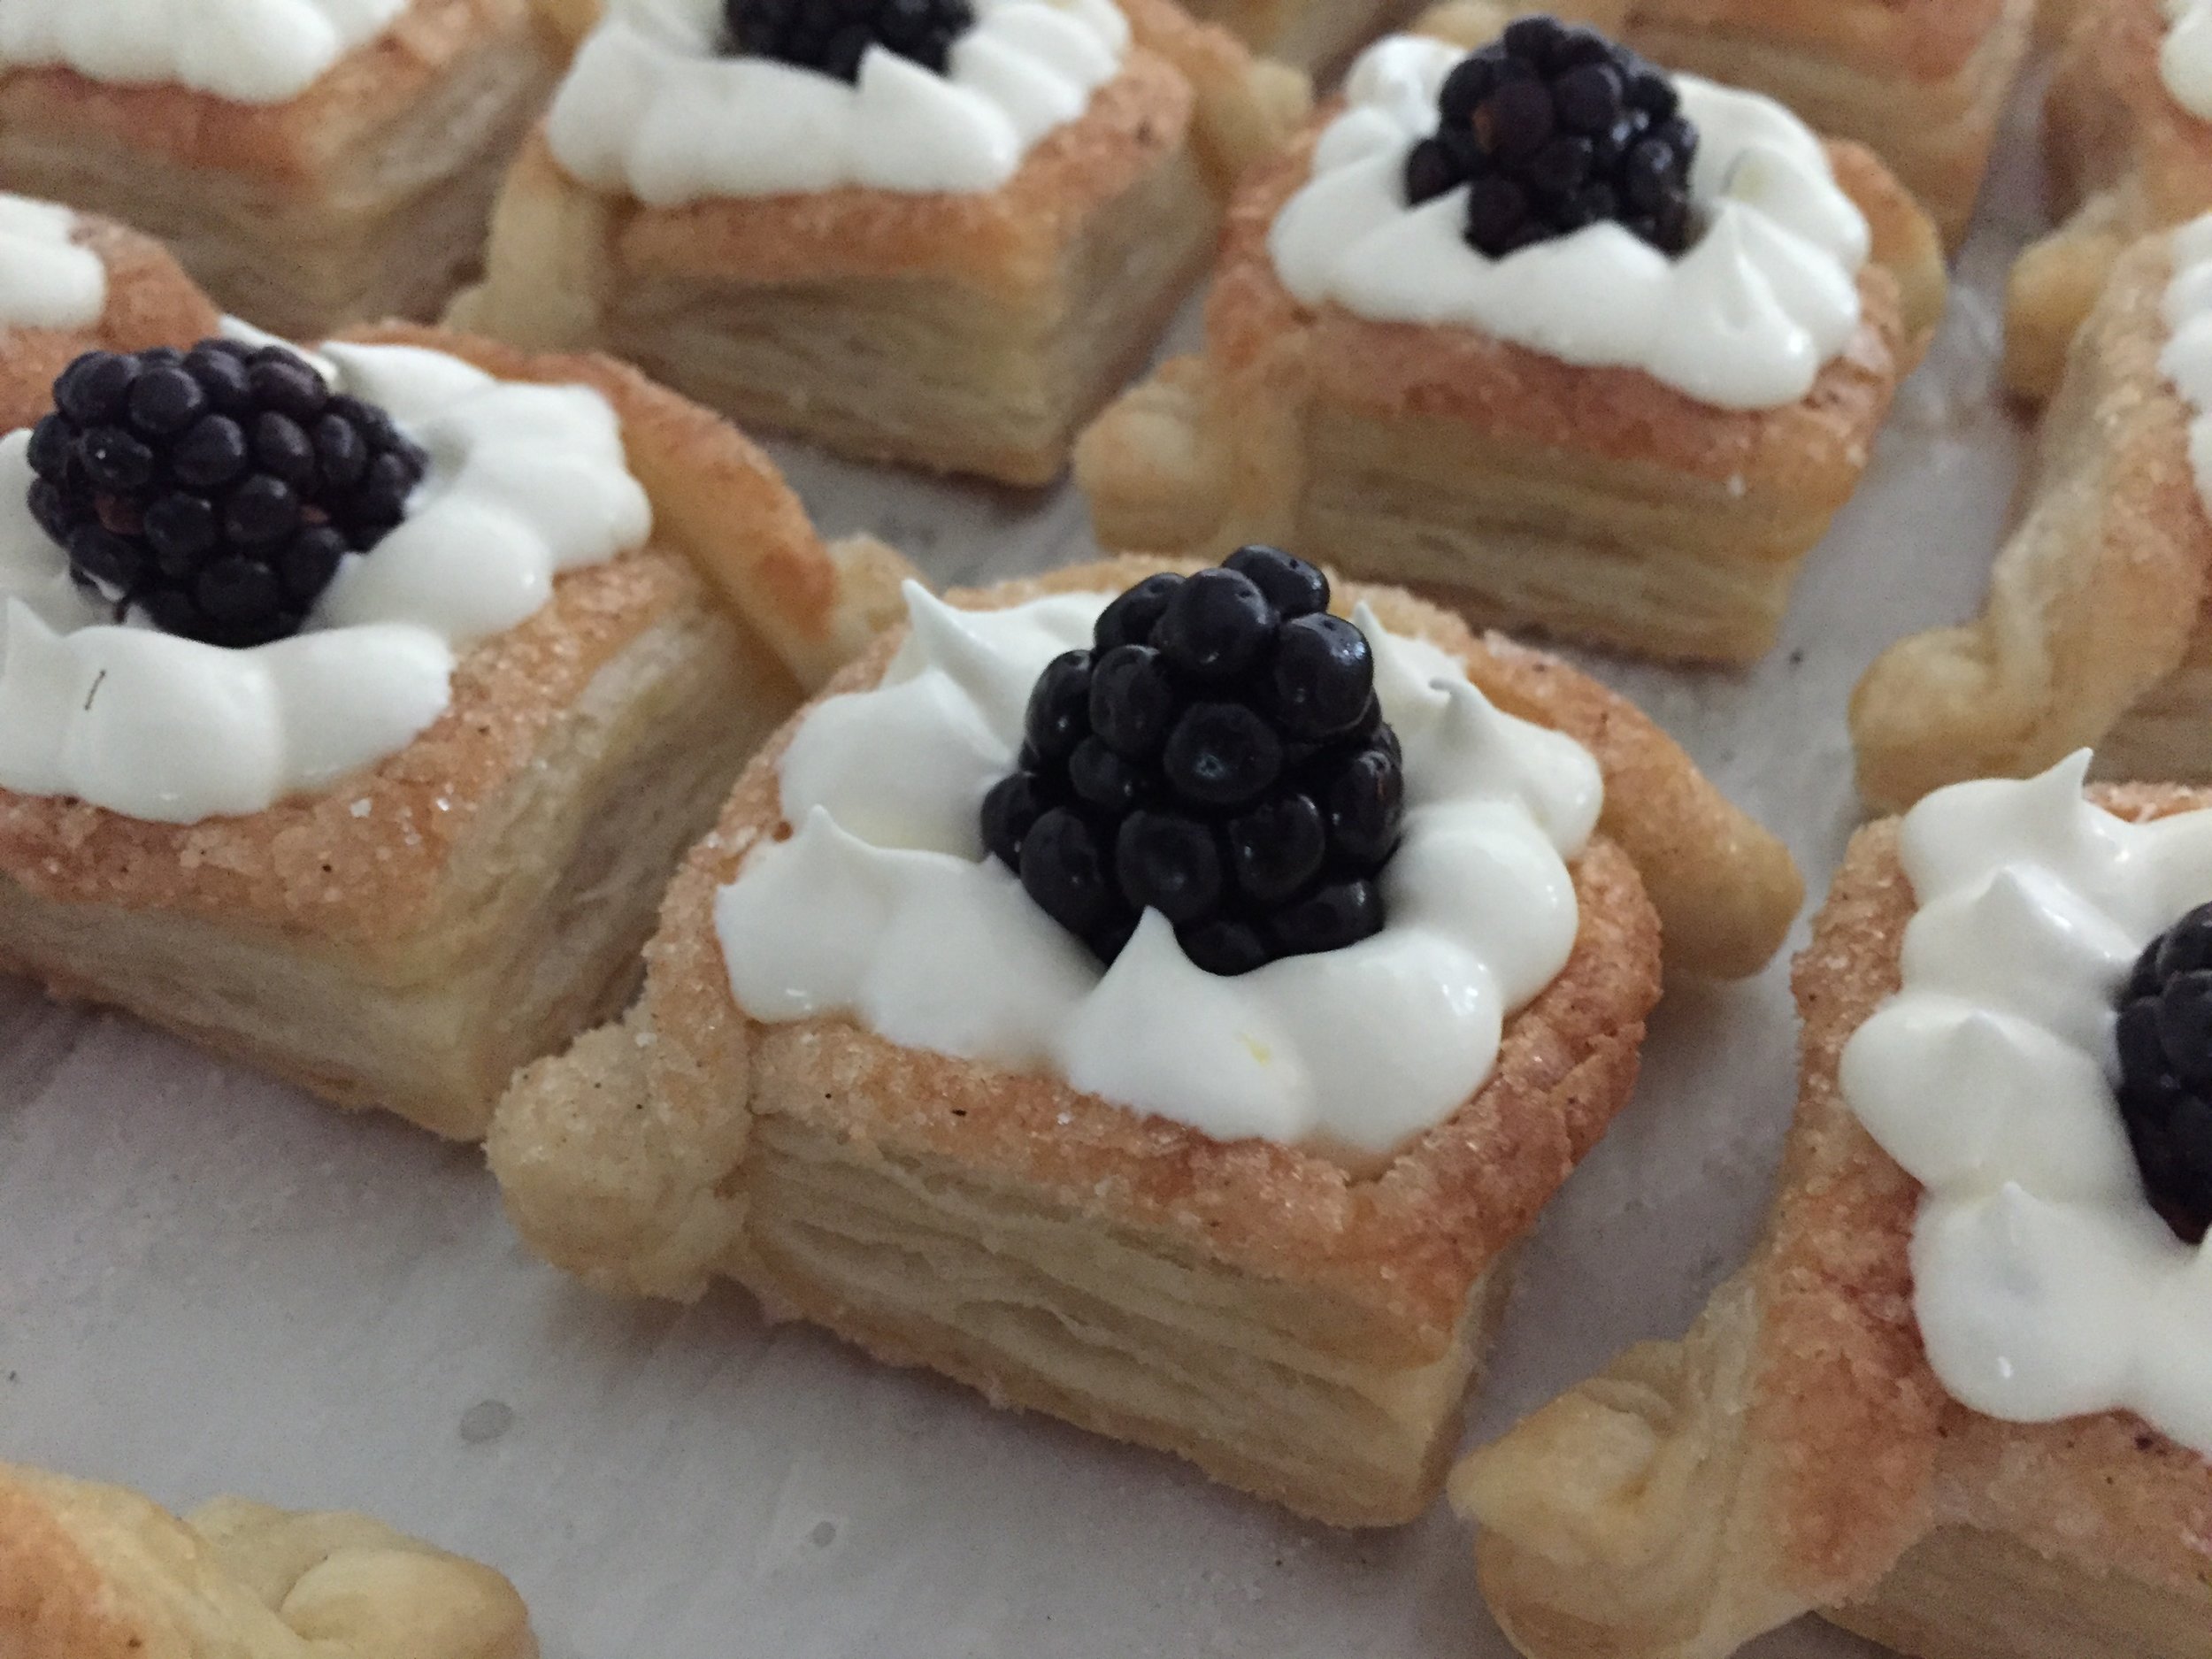
The spring board for this off-the-cuff post was a shortcake made recently during a teen’s summer culinary camp session at Sur La Table where I teach baking and pastry classes. The recipe is very similar to my usual scone recipe with a couple of tweaks: more cream and no egg. The result, especially warm from the oven, has just the right crispness on the surface and a dense yet light melt-in-your-mouth texture inside. Yum. Yum.

And ya wanna know the cool part? The dough is made in the food processor! I’m here to tell you that I’ve been a staunch “by-hand” scone and flaky pie dough maker for a long time without the need (or desire) for gadgets. Give me a simple dinner fork, bowl scraper, bench scraper, small offset spatula, paring knife, silicone spatula for many dough mixing and bench top projects and I’m in heaven.

Ahhh . . . . but wait. I am now on the best of terms with the food processor for those flaky doughs made with cold cubed butter - quick pulses and voilà! Think your best pâte brisée, quick puff pastry, buttery scones and biscuits - all of ‘em!

IMG_4050.jpg

Here’s the shortcake recipe:
1. Heat the oven to 425ºF. Have a parchment lined sheet pan ready.
2. Cube 113 g (1 stick/4 ounces) cold unsalted butter and hold it in the freezer until ready to mix.
3. Have one cup of cold heavy cream standing by in the fridge.
4. Place 260 g (2 cups) all purpose flour (or 60 g whole wheat pastry flour + 200 g a.p. flour), 50 g (1/4 cup) sugar, 8 g (2.5 teaspoons) baking powder and 1/4 teaspoon fine sea salt in the bowl of a food processor. Pulse it a couple of times to mix.
5. Add the cold cubed butter and pulse briefly several times to break it up - you WANT pea to pecan-half size pieces of butter left!
6. Add the cream and pulse again briefly several times just until the dough comes together.
Turn the mixture out onto a lightly floured surface and lightly squeeze any clumps together. Don’t overwork. Form a 4”x8” rectangle and cut 8 squares.
7. Place the squares on the prepared sheet pan, brush tops with cream and sprinkle with coarse sugar. Place the sheet in the freezer for 10-15 minutes then bake about 15 minutes until the tops are golden brown.
8. Cool or serve still slightly warm with fresh strawberries and whipped cream or ice cream of choice.

Either split your shortcake/fill it/cap it and top with berries and cream or simply leave it whole and pile on the goods, it’s up to you. You can even chunk it up in a bowl and crown it with creamy, fruity goodness. Any way you do it, it’s superb!

IMG_4052.jpg
IMG_4058.jpg

Here’s to lots more summer berries. Enjoy!

Reine de Saba

IMG_3998.JPG

Reine de Saba (Queen of Sheba) is essentially a chocolate almond torte and reportedly one of Julia Child’s first French gateau experiences - one that helped launch her into what would become a fantastic culinary adventure for life.

There are a bevy of different recipes out there for this one - most involve melting dark chocolate with butter, separating the egg whites and yolks, whipping the whites with a portion of the sugar to create a meringue, adding almond flour along with your choice of a small amount of all purpose flour or alternate flour like teff and folding everything together.

After my review of a half dozen or so recipes I ultimately landed on two of Alice Medrich’s - one from “Seriously Bittersweet” and one an alternate grain version from “Flavor Flours” which uses teff flour (gluten free!) in place of all purpose. Dense, dreamy, creamy yet light and chocolate-y all at the same time. That woman KNOWS her chocolate boy oh boy! Thanks A.M.

IMG_3990.jpg

In “Seriously Bittersweet” A.M. dedicates a page to the “versatility and the role of ingredients” in creating these chocolate gateaux. She says “This type of torte is essentially an extremely buttery chocolate egg custard given texture with ground nuts and maybe a little flour. The basic ingredients are standard, but the quantity of each is almost infinitely flexible”.

She goes on to explain how the eggs (whether separated or not) help bind the rest of the ingredients whether you use 3, 4 or 5 eggs; how even a small amount of flour adds a smoothness to nutty tortes by affecting the way the eggs cook; how nuts can be used un-blanched , blanched, toasted or raw as well as in different quantities - a lower measure of nuts will give you a less cake-y and more mousse-y custard like torte, while whole ground nuts will provide a coarser texture than more finely milled nut flours.

Butter adds flavor, contributes to texture and provides moisture as well. Brewed coffee or different liqueurs or spirits like rum, bourbon, kirsch, Frangelico or Amaretto add flavor too. So many possibilities.

While each of these two recipes uses practically identical ingredients, the teff version (below) keeps the eggs whole and everything is blended together in one bowl - easy-peasy. You can even use a hand held mixer. Ms. Medrich points out that the secret to a fluffy batter for this one is chocolate not too warm, butter not too soft and eggs cold!

IMG_3961.JPG

Here goes!
Heat the oven to 375ºF. Butter the bottom of an 8” springform pan then line the bottom with parchment.
Mix 70 g almond flour with 35 g teff flour and set aside.
Melt 170 g dark chocolate (70% recommended) over a barely simmering water bath, set aside and let cool to lukewarm.
Have 150 g sugar, 140 g unsalted cubed butter softened (not too!), 1/8 teaspoon salt and 4 cold large eggs at the ready.
Add almond-teff flours, sugar, butter chunks and salt to the chocolate and beat on medium with the hand held mixer until well blended and the batter thickens and lightens in color.
Beat in the eggs one by one then beat on high speed for a minute or so until fluffy and lighter in color, like chocolate frosting.
Scrape batter into the prepared pan and spread evenly.

Looks like chocolate frosting to me!

Looks like chocolate frosting to me!

Bake 30-35 minutes until a tester inserted in the center comes out with a few moist crumbs.

IMG_3964.jpg

Slide a thin knife or small offset spatula around the sides to allow the cake to sink slightly as it cools. Cool completely.

IMG_3967.JPG

For the more traditional version using all purpose flour, the process involves separating the eggs and whipping them separately with portions of the sugar. Rather than almond flour, whole natural almonds are processed with the flour to a coarse texture, giving the end result a toothy, nutty-textured chew.

IMG_3968.JPG

For the second version heat the oven to 375ºF, butter the bottom of an 8” springform pan and line it with a round of parchment paper.

Place 170 g coarsely chopped chocolate (66-70%) and 140 g unsalted butter in a medium heatproof bowl set into a wide skillet with barely simmering water. Stir periodically until melted then, off the heat, stir in 3 tablespoons brandy (optional - I added some vanilla extract instead), 1/8 teaspoon almond extract and 1/8 teaspoon salt. Set it aside.

Pulse 70 g unblanched whole almonds and 15 g all purpose flour in a food processor to a cornmeal-like texture. Set aside.

Separate 4 large eggs: in a large bowl whisk the yolks with 100 g sugar until well blended then stir in the chocolate mixture.

In a clean, dry bowl whisk the whites and 1/8 teaspoon cream of tartar on medium to soft peaks then sprinkle in 50 g sugar and beat at high speed to stiff but not dry peaks.

Now place 1/4 of the egg whites and all of the nut/flour mixture on top of the chocolate batter and fold them in with a large rubber spatula. Fold in the remaining egg whites.

Combining everything

Combining everything

Spread the batter into the prepared springform pan. Can you see the nut particles?

Ready for the oven

Ready for the oven

Bake 25-30 minutes until a tester inserted into the center is still moist but one inserted ~1.5 inches from the edge is almost clean (whoa - talk about nuance!)

All baked up

All baked up

A light dusting of confectioner’s sugar sets off the dark chocolate nicely.

IMG_3993.jpg

As usual, Steve and I did our mandatory taste test. We first tried the teff version which had a great chocolate flavor and smooth, creamy texture. But we gave the nod to the second version, enjoying the melt-in-your-mouth custard like center and the mouth feel of the coarser nuttier texture. Deelish!

Served with a honey-tinged Scandinavian yogurt and some fresh strawberries it was, in my estimation, superb (even though Mr. Steve is not a big yogurt fan).

IMG_3996.JPG
IMG_3998.JPG

The longer you bake, the more you begin to realize how much variation and play can happen from recipe to recipe. Even though we accept the fact that not everything always turns out as we had hoped, it’s a beautiful thing to try your own version and make it fun!

Happy summer!!

Tartelette trio - some classics

Lemon feuilletées / blackberry / lemon mascarpone

Lemon feuilletées / blackberry / lemon mascarpone

Dark chocolate ganache / brownie cube / whipped milk chocolate ganache

Dark chocolate ganache / brownie cube / whipped milk chocolate ganache

Fresh berries / pastry cream / raspberry gelée (yes - you’ve seen these before!)

Fresh berries / pastry cream / raspberry gelée (yes - you’ve seen these before!)

After my last couple of posts on Americana themed baked offerings, I’m turning back to my French pastry loves for the summer months. So much to talk about!

You know I’m always one for tart making, especially the petite versions of my favorites. This time around it was for a special luncheon for a group of former co-workers who gather once a year at Heron Woods/Manor, a local independent/assisted living facility just down the street from my home. Deftly orchestrated by Kim and David, it was a fine repast of salads, soup, fresh croissant (made by yours truly!) and topped off with the tartelettes for dessert.

These three babies were so fun to put together. The lemon consisted of baked quick puff (more on that in an upcoming post) feuilletées, one of the coolest twisted versions of a puff pastry case that there is, filled with my new favorite version of lemon curd (from the book “Sweet” by Yotam Ottolenghi and Helen Goh), then baked a second time to set the curd. Follow that with a whipped lemon curd mascarpone garnish and fresh blackberry and it’s done!

Waiting for a short bake

Waiting for a short bake

Garnishing in process

Garnishing in process

The chocolate ganache offering was my usual chocolate pâte sucrée and dark chocolate ganache filling, but this time I cut small brownie cubes to tuck in so they would be a hidden surprise under the whipped ganache garnish.

Trust me - there’s a brownie cube hidden in there!

Trust me - there’s a brownie cube hidden in there!

Of course the fresh fruit choice follows the classic approach of a blind baked pâte sucrée crust filled with crème pâtissière lightened with some whipped cream and then topped with fresh berries coated in a raspberry gelée. Mmmmm good!

IMG_3904.jpg

I must say I never tire of these and I hope you don’t either!

All toted up and ready to go

All toted up and ready to go

What a delicious trio! The followup up report from the luncheon-ers was a huge thumbs up! Yay, I love that!!

A quick end note: I walk regularly and so enjoy seeing nature in its various forms - the birds, the wild flowers, the flowering trees, and especially now the aroma of the lilac bushes I pass at various points in my route. It’s my time for thinking and reflection and helps me keep my head straight. This morning it was a scattering of simple wild daisies amongst the “ weeds” that caught my attention. Lightly coated with dew and looking so content, it made me smile. The simple things are often the best, don’t you think? Enjoy.

IMG_3914.JPG