Fresh asparagus, Fulton Farmers Market and pizza


The Fulton Farmer's Market is back in full swing for the season, and we've been drawn to the fresh asparagus for the past couple of weeks. So good and soooo springy!   

Steve's favorite veg vendor is Visser Farms located in Zeeland. He usually scores the fruits of their labors throughout the market season, particularly potatoes (German butterball being one of his faves), carrots, broccoli, cauliflower and green beans (we LOVE fresh Michigan green beans in the summer!!).


On to the subject at hand.

Let's not forget that I do like to wander off into the savory baking realm every now and then, for life is not only about pastry, right? Pizza dough is one of those things I typically have stashed in the freezer for those days when pizza sounds like just the ticket.

First let me mention the dough. Back in 2006 when I was going to Apicius in Florence for my first semester of baking and pastry, Steve and I frequented an English bookstore there. At one of our visits we found a newly released book (I have no idea which one) by Jamie Oliver which was accompanied by a mini-book of sample recipes that was available for purchase. And purchase it we did.

His pizza dough recipe is one I've been using ever since, save for the occasional trial of a new recipe, just to see if I might want to make a change. I always seem to come back to his.

While I typically mix and knead by hand, lately I've taken to using my Kitchenaid stand mixer for the first part of the kneading and finishing it off by hand. LOVE the feel of dough.

Here's the recipe in a nutshell. To 650 ml tepid water add 14 g dry yeast (instant or active dry, either one) and 1 tablespoon sugar, mix with a fork and let sit for a few minutes. Meanwhile place 800 g bread flour and 200 g semolina in a mixing bowl along with 1 tablespoon fine sea salt; give it a quick whisk up with a fork.

Using the dough hook, turn on med-low speed and drizzle the wet ingredients into the dry. Here's where I make my own addition to Jamie's recipe of 2 tablespoon olive oil. Knead on med-low speed for about 4-5 minutes then turn the dough out onto a lightly floured surface and continue kneading for another few minutes to achieve a soft, springy dough.

Cover with cling film and let rest about 20-30 minutes at room temperature. I divide the dough into six 283 g (10 ounce) pieces, wrap them individually, pop 'em into a zip-top bag and freeze.

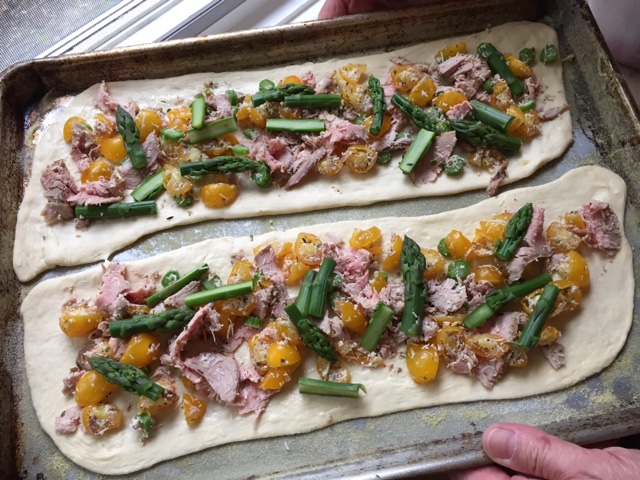
If using the dough immediately, roll it out on a lightly floured surface, place on your oiled sheet pan (or baking stone or baking steel or whatever you're using), top with your favorite pizza goodies and pop into a 500º oven.

Pizza is one of our favorite ways to use up fridge left overs like grilled chicken or pork (thinly sliced for pizza purposes) and chunked up roasted potatoes. We generally add in some fresh veggies like tomatoes and shaved broccoli followed by a topping of grated cheese.

This time - fresh asparagus. Yippee!

It was a simple matter of cutting the lovely green stalks into shorter pieces, peeling and slicing the stems in half and throwing them into the mix. No blanching ahead of time, just freshly cut and trimmed.


I've been using a good old 1/2 sheet pan for a long time - olive-oiled and dusted with semolina, then into a 500º oven for about 13-15 minutes.  Et voila!


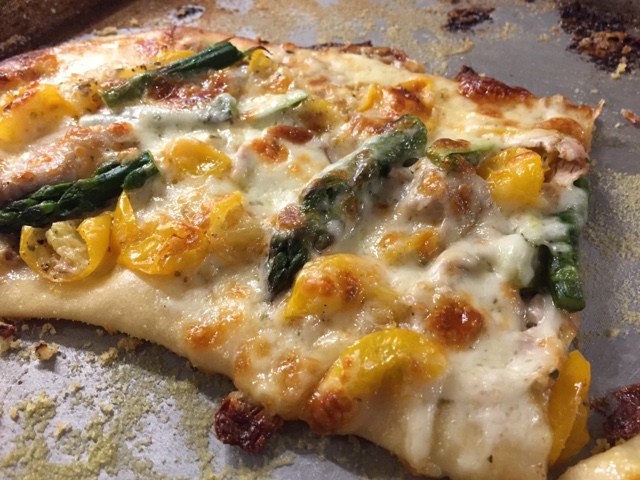
We top our hot out of the oven pizza with some lightly dressed shredded or chopped up greens, basically creating a pizza and salad in one.


The presentation may not be the most artful, but boy-oh-boy it's good!

Some new flour ingredients


Thanks to my recent discovery of Alice Medrich's book "Flavor Flours", I've been playing around with recipes using a variety of alternative flours - and I've only begun to scratch the surface.

They happen to be gluten free, although that was not the primary reason for my experiments.  I'm intrigued by the many options now available to both the baking and pastry enthusiast and pastry professional.  Always learning, always testing, always trying new things.  That's what it's all about!

First off - coconut flour.

This recipe is for a tart crust, and it is, in a word, DEElicious - very reminiscent of the quintessential American coconut macaroon.

It's easy to put together.  Combine 40 g coconut flour, 100 g shredded unsweetened coconut, 1/4 teaspoon baking powder, 1/2 teaspoon salt, 85 g soft unsalted butter, 100 g sugar and 1 large egg white in a bowl.  Mix until the ingredients are blended then press evenly into a 9" fluted, removable bottom tart pan, making the sides thicker than the bottom.


Heat your oven to 350ºF, set the lined tart pan on a parchment lined baking sheet and bake 18-20 minutes until nicely browned.


Let cool for 15 minutes or so then push the bottom up to free the crust from the pan and loosen the sides. Finish cooling for 2 hours before filling.


Now here's where I leave the filling up to you.  

I filled mine with coconut pastry cream made by replacing the whole milk in my standard recipe with coconut milk - yum.  Then you have the option of topping the tart with mango slices, mixed tropical fruits, mixed berries or whatever your heart desires.

Or how about a nice chocolate ganache filling topped with a sprinkling of toasted coconut?

Or fill the crust with some toasted, chopped nuts of choice mixed with some homemade caramel then cover with a whipped milk chocolate cream.

Or perhaps a luscious lemon-lime curd with some finely diced crystallized ginger?

You decide.

Next up - oat and rice flour.  This one is an oat sablé recipe (and you know I'm a sucker for shortbread!).


Whisk together 140 g oat flour, 55 g white rice flour, 1/4 teaspoon salt, 1/8 teaspoon baking soda in a large bowl. Add 130 g sugar, 60 g chunked up cream cheese, 170 g chunked up soft butter and 1 teaspoon vanilla extract and mix with a fork or spatula to blend into a smooth dough.

Form two logs about 1.5 inches in diameter (or whatever diameter you wish), wrap tightly in wax paper or film wrap and refrigerate for at least 2 hours or overnight.  You may also freeze the dough for up to 3 months.

First I did the log approach.  I sliced rounds and baked at 325ºF for 12-15 minutes until nicely browned.


The cookies did spread a bit, something I'm suspect has to do with the difference in structure of a non-gluten dough. Plus the ratio of sugar to the total flour is higher than my typical shortbread and could also contribute to more spread during baking.  It's a learning curve to be sure.

Next I took a portion of dough, formed small nuggets and baked those.


They had a more faceted look and were rather pleasing in the small-bite sense of the word.

These are GOOD - a nice crunch, butteriness and delicious flavor all the way around. Yes.

And now - teff! 

An ancient Ethiopian grain, teff is loaded with calcium, iron, Vitamin C, fiber, protein and more.

I chose a chocolate sablé recipe for my first trial with this healthy and interesting ingredient. I know - more shortbread.


Place 150 g teff flour, 60 g white rice flour, 35 g unsweetened cocoa powder, 135 g sugar, scant 1/2 teaspoon salt and 1/8 teaspoon baking soda in a large bowl and whisk to blend.

Add 170 g unsalted chunked up soft butter, 60 g chunked up cream cheese, 1 tablespoon water and 1 teaspoon vanilla extract to the dry ingredients and mix with a fork or spatula until blended into a smooth dough.

You can form logs as with the oat sablés but I chose to wrap and chill the dough then simply form rough ball shaped pieces sprinkled with a little sugar. I placed them on a parchment lined sheet pan and held them in the freezer while the oven was heating.


Heat your oven to 325ºF and bake for about 25 minutes until firm to the touch.  While it's hard to tell if they've browned, I found they looked more dry with a bit of cracking on the surface as a reasonable sign that they were done.


These babies did not disappoint!  Nice chocolate flavor, a texture with just a hint of fine graininess (not a bad thing, by the way), plus deliciously crisp and buttery. And Steve liked them too!

"Flavor Flours" is divided into sections by type of flour, including not only the ones I've used so far, but also chestnut, sorghum, buckwheat, corn and nut flours.

There is definitely another world out there folks! Here's to new tastes and textures. Yes indeed.


New York style bagels


After teaching several bagel classes recently I was gung-ho to make my own New York style bagels at home.  Chewy, molasses-y and yummy.

The process is pretty straight forward.  Make the dough, let it rise, divide the dough, shape the bagels, let 'em rest a bit, boil 'em, egg wash and top 'em, then bake them in the oven for the finale.

All in an afternoon's work.

Following the Sur La Table recipe for 8 bagels, combine 500 g bread flour and 1 tablespoon salt in the bowl of a stand mixer fitted with the dough hook.  Mix briefly to combine.

In a separate bowl place 1.5 cups warm water and sprinkle in 2 teaspoons active dry yeast and 1 tablespoon sugar.  Let stand for 5 minutes until the yeast starts to foam.  Add in 2 tablespoons barley malt syrup and stir to dissolve (see note).

NOTE: since I didn't have barley malt syrup on hand I substituted 4 teaspoons molasses at 2/3 the quantity.  

With the mixer on low add the yeast mixture to the flour/salt and mix to combine.  Then knead the dough on medium speed for 6-8 minutes until smooth and elastic. The dough is a bit sticky.

Place the dough in a lightly oiled bowl and allow it to rise in a warm spot for about an hour (until doubled).

after the rise

Now comes the fun part!  Shaping - yes! 

Before you start, get the oven heating to 425ºF convection (450 conventional).

Turn the dough out onto a lightly floured surface, deflate lightly and divide with a bench scraper into 8 pieces.


Shape each piece into a smooth, tight ball.  This step is the most fun, especially once you get the feel of the dough as it rounds up and develop the muscle memory in your hand to make it happen.  You gotta be there to understand it.


OK, so maybe THIS step is really the most fun - forming the bagel.

First stick your thumb through the center.


Once the hole is formed, place your index and middle fingers through it and rotate to stretch out the hole to about 2 inches.


This is just one of the ways to shape a bagel. The other involves rolling each piece into a snake, bringing the ends together in an overlapping fashion, then putting your fingers through the center, palm down, with the overlap on the work surface and rolling to seal.

Once the bagels are shaped, place them on a lightly floured surface, cover with a damp cloth and let them rest about 10 minutes.


Meanwhile, bring about 4 quarts of water to a boil, adding about 3 tablespoons barley malt syrup (or in my case, about 2 tablespoons molasses).

Drop the shaped and rested bagels into the boiling water and boil for a minute on each side.


Lift them out with a slotted spoon and place on a grid to drip a bit, then brush with egg wash and sprinkle with topping(s) of choice.  I chose sesame seeds for some and left the rest plain at Steve's request.  

Have a sheet pan ready lined with parchment and sprinkled with cornmeal.


Now pop 'em into the oven and bake for about 20 minutes until nicely browned.  

ATTENTION! Don't open the oven for the first 10 minutes. The initial steam produced by the wet bagels as they go into the hot oven contributes to the crusty exterior.  Plus I'm told that if you open the oven too soon, your bagels may deflate a bit.  Oh no!

But DO rotate your pan after the first 10 minutes to get a nice even bake. It's a rule I follow regularly, no matter what I'm baking.


Looking good.


Let these babies cool, then slice right in and enjoy.  I decided for a simple cheddar cheese on mine.


The chew, crumb and molasses essence of this was soooo good.  Yes indeed.