Milk chocolate malted ice cream profiteroles

IMG_0677.jpg

After that extensive Danish Kringle post (whew!) I knew it was time for a break with a quick note on a fun and delicious dessert experience.

This past weekend we celebrated Steve’s birthday in isolation, enjoying a tipple of champagne followed by his famous marinated flank steak on the grill, roasted little potatoes and a veggie mix of edamame and last summer’s freezer stashed sweet corn. Mmmm mmmm good.

As luck (or the fates) would have it, I had choux puffs in my freezer that were originally intended for an event that was canceled due to the pandemic, and I’d been scheming about how I might use them. Since anything made with choux paste is on Steve’s favorites list, I knew they would have to be part of his birthday dessert.

I recently posted on making chocolate chunk bars as a way of using up some of the chocolates I had in my cupboard. I still had some Valrhona milk chocolate on hand, as well as Carnation malted milk powder which I originally purchased some months ago to make brown butter shortbread cookies. Inspired once again by Claudia Fleming’s “The Last Course”, milk chocolate malted ice cream was officially on the menu. Profiteroles here we come!

IMG_0686.jpg

What a great plan ahead dessert. Make your choux puffs using your favorite recipe and stash ‘em in the freezer where they’ll be fine for some weeks. Make or buy any flavor ice cream you choose a few days, or even a week or two ahead and you’ll be ready to assemble on the big day.

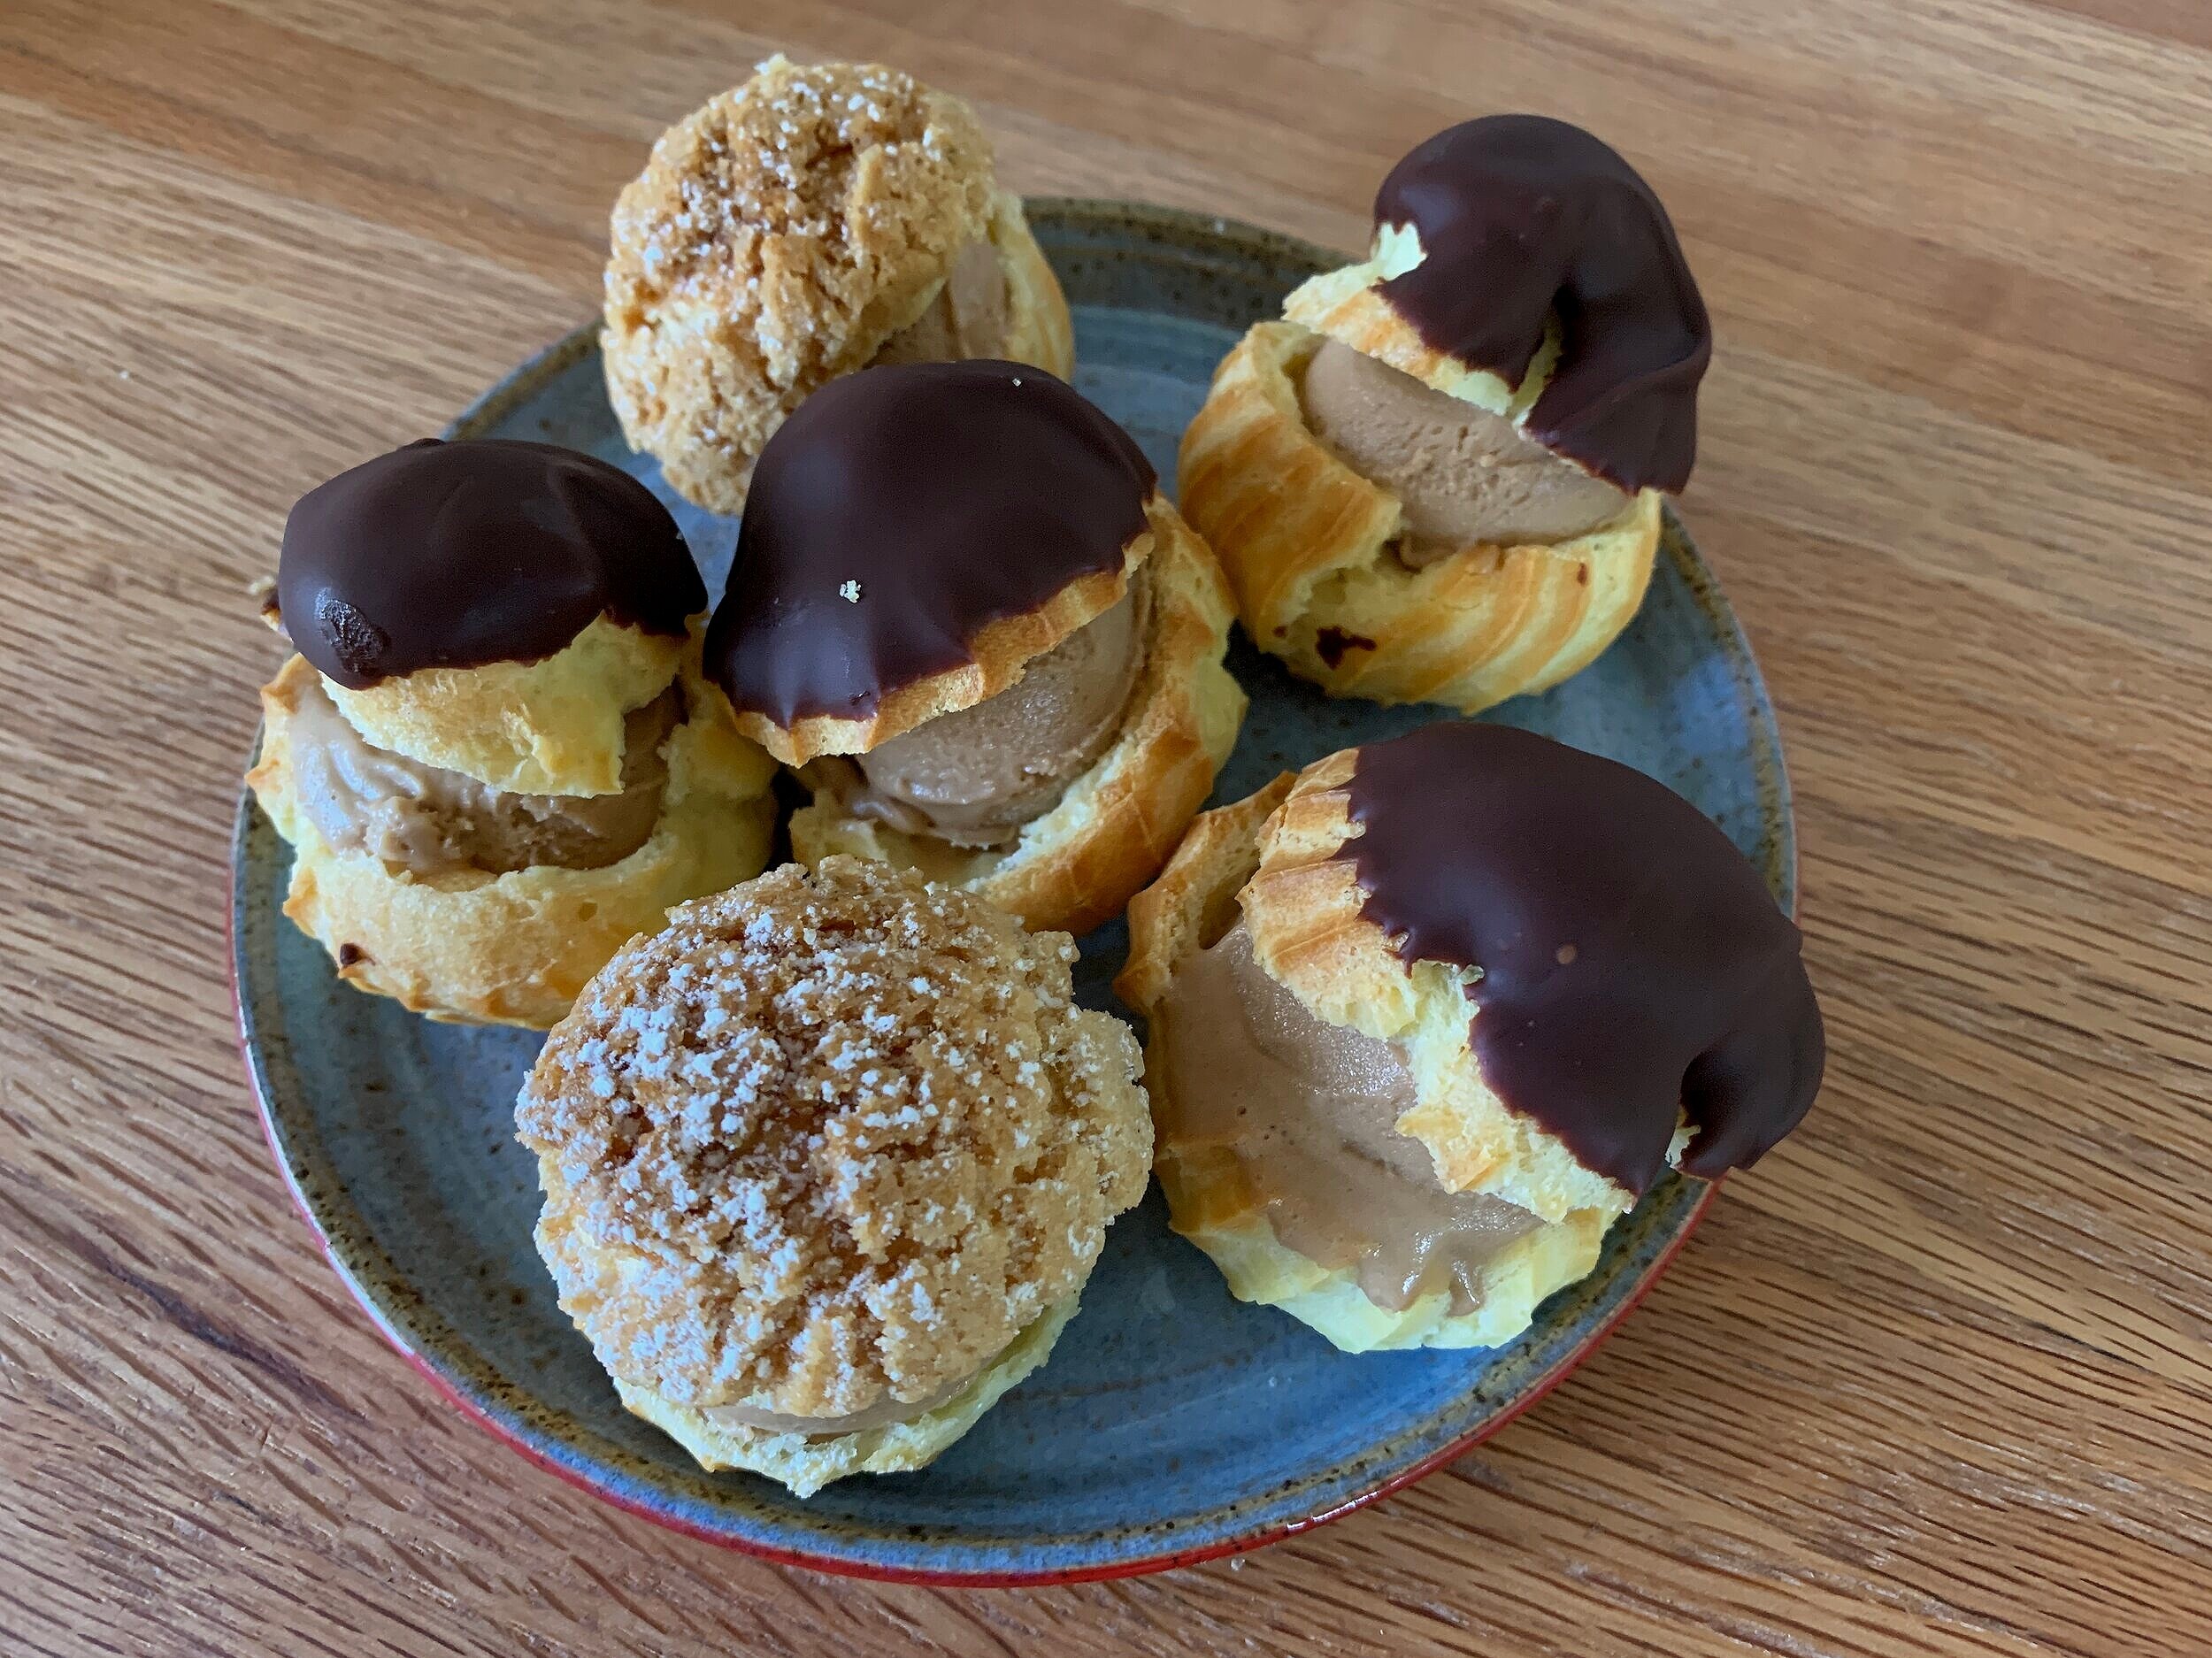
I made my usual ice cream base and, once cooked and off the heat, blended in 113 g / four ounces chopped milk chocolate, 28 g / one ounce 64% Guittard chocolate discs and a scant cup of Carnation malted milk powder (sift before whisking it in). Then strain and chill.

I usually keep my ice cream bases refrigerated for a day or two before processing. Once the ice cream is churned it needs a good 3-4 hours in the freezer to firm up. But you can make it ahead and it should be fine in the freezer for a week or two.

On the day you plan to serve the profiteroles, take out as many as you want, put ‘em on a parchment lined sheet pan and warm them in a 300ºF oven for 10 minutes or so to thaw them and crisp them up a bit. Cool before slicing the tops open and filling with lovely scoops of frozen goodness. Then simply put them back in the freezer to hold until serving.

IMG_0667.JPG

A quick note about ice cream - this malted milk version was easy to scoop right out of the freezer (maybe due to the malted milk powder??), but some flavors of ice cream will freeze harder than others. Give yours a feel and if it’s rock hard, take it out 10-15 minutes ahead of scooping for greater ease of assembly.

IMG_0668.jpg

For a lovely ending to Steve’s birthday meal I just popped a few in each of our bowls, topped them with chocolate sauce, caramel drizzle and chocolate shortbread cookie crumbs et voilà - un dessert três délicieux!

The next day I had empty puffs on hand and more ice cream so I filled them all and froze them for enjoyment later. I found that once they had firmed up over the next hour or two, I could turn ‘em upside down while gently holding the tops on and dip them in a chocolate glaze made by melting 113 g / 4 ounces dark chocolate with 42 g / 3 tablespoons unsalted butter, then back into the freezer they went.

In case you’re wondering, I had a few crunchy topped puffs in the mix which I left unglazed.

IMG_0674.jpg

Even though we work at keeping our meals pretty darn healthy, during these days of ongoing isolation it’s nice to be able to anticipate a little sweet treat every now and again don’t you think?

Stay home, stay safe and keep on baking!

IMG_0677.JPG

Danish Kringle

IMG_0454.JPG

More fun with laminated dough - an interesting project indeed!

As I was researching and reviewing the pastry known as Danish Kringle I learned that kringle is the word for pretzel and that Danish bakeries typically have a sign outside their shops shaped like a pretzel topped with a crown. A sure sign of good things inside.

Scandinavia is on Steve’s and my travel hit list, although it’s strange to contemplate when we might be able to travel again given our current times. We can only hope. In the meantime I’m reading and learning more about the types of baked goods that come from that corner of the planet. Cool stuff.

IMG_0446.JPG

Made with the Danish version of laminated dough (wienerbrød in Scandi talk), this is a traditional almond filled pastry, popularly served in Denmark for occasions like birthdays, anniversaries and other festivities. Much like croissant dough in its preparation, the primary difference is the addition of egg to the dough. As is true when comparing a number of recipes for a particular pastry, the range of ingredient quantities can certainly vary, particularly the amount of butter used for the laminations.

Inspired by Brontë Aurell’s version in her book “Brontë at Home”, I compared her Danish dough base recipe with several others, most notably the one in my 2004 first edition of CIA’s book “Baking and Pastry - Mastering the Art and Craft” (there have since been two further editions in 2009 and 2015).

It was the first pastry tome I purchased upon our return to the USA after completing my stage at Pâtisserie Pascal Pinaud in Paris’ 5th arrondisement in March of 2007. I used it as my primary reference source (and still refer to it all these years later) during my first summer job that year at JM Gerrish Provisions in Winter Harbor Maine. My how time flies.

IMG_0642.jpg

I ended up creating my dough recipe based on an amalgamation of Aurell’s and CIA’s - pretty similar actually, save for the lesser butter block quantity in CIA’s version. I tend to take a “less is more” approach in my croissant dough too.

The dough: remember if you’re going to mise out your ingredients ahead of time, keep the yeast separate from the salt until ready to actually start mixing since the salt can inhibit the yeast.
Using a stand mixer fitted with the dough hook, mix 375 g / scant 3 cups bread flour, 43 g / 3 tablespoons granulated sugar, 6 g / 2 1/8 teaspoons instant yeast, 6 g / 1 teaspoon salt, 40 g / 3 tablespoons soft unsalted butter, 1 large egg, 1 large egg yolk and 175 g / 3/4 cup room temperature whole milk. Blend on low speed for 2 minutes then increase to medium speed for 4 minutes.

Place the dough in a lightly greased bowl, cover and let rise for about 2 hours. Gently turn the dough out onto a lightly floured work surface, fold it over and form a rectangle on a parchment lined sheet pan. Wrap tightly and refrigerate overnight.

Form 243 g / 2 sticks + 1 tablespoon unsalted butter into a ~8”x8” square by tapping/rolling it between plastic wrap. Keep it wrapped and refrigerated until you’re ready to perform the butter incorporation and the laminations.

Let’s review the steps of creating a laminated dough. Take the butter out of the fridge about 20 minutes before you’re ready to go, then tap it with your rolling pin to make it more malleable - you want it cool and bendable.

Remove the dough from the fridge and roll out to ~8”x 16” rectangle. Place the butter in the middle of the dough and fold one end over it to cover half of the butter as seen below. Do your best to keep the corners square.

IMG_0420.JPG

Fold the other portion of dough over the remaining butter. You can stretch the dough a bit to square off the corners and pinch the edges and center seam together so as to completely envelope the dough. This is called the “lock-in” or le beurrage en Français.

IMG_0421.JPG

Next you’ll roll the dough out to an ~8”x 24” rectangle, paying attention to the edges and center seam to keep things together and prevent any butter from sneaking out. I like to roll the dough with the sealed edges positioned at top and bottom and the center seam vertical to me. Feel free to flip the dough seam side down as you roll.

If your dough ever becomes too warm and butter starts breaking through, wrap and chill it for 15-20 minutes to firm things up again.

IMG_0422.JPG

Typically croissant and Danish dough are put through three 3-folds (also called letter folds), but for this project I started with a 4-fold or book fold. Visualize the center of the dough, fold each end into the center to snuggle up to each other (leave a skosh of a space to allow for folding it) . . . . .

IMG_0423.JPG

then fold it on itself like a book.

IMG_0424.JPG

An important thing to remember when making laminated dough is that after each fold you turn your dough 90 degrees before you roll it out for the next fold. Think of it as the spine of a book on your left.

IMG_0425.JPG

Now wrap the dough in plastic wrap and refrigerate it for 30 minutes before doing the next fold. That keeps the dough/butter cool and stable and allows the dough to relax as well.

Roll it out again into a rectangle but this time visualize the dough in thirds and fold it like a business letter. One end up . . . .

IMG_0434.jpg

the other end down.

IMG_0435.jpg

Wrap and chill another 30 minutes. Making sure the “spine” is on your left, roll it out and repeat another 3-fold. Now the dough is complete. Wrap and chill for at least 30 minutes or up to overnight before rolling it out for its intended use. It can also be frozen up to a month.

Check out these layers!

IMG_0453.JPG

Before rolling the finished dough out for the Kringle, make the almond filling (remonce) by blending together 100 g EACH of almond paste (Mandelin brand is great!), softened unsalted butter and confectioner’s sugar. This is enough filling for one full Danish Kringle. Many Kringle recipes also include raisins but I opted out on that one.

Side note: New word alert for me! Remonce is said to be a Danish word and creation and refers to a commonly used filling in many Nordic cakes and pastries. Almond is a common flavor but it can be made with other nut pastes like pistachio or hazelnut or flavored with cinnamon, cardamom and/or vanilla, depending on what you’re making. For cinnamon rolls the confectioner’s sugar is often replaced with dark brown sugar. Life is full of variations, eh?

IMG_0419.JPG

For this my first Kringle attempt I followed Aurell’s instructions for rolling, filling and shaping the dough. Because her description of the process wasn’t terribly clear (there are no images in the book to help), I checked out a couple of YouTube videos and also went somewhat by instinct.

On a lightly floured surface roll the dough lengthwise to a rectangle about 7”x20” then split it right down the middle length wise. A pizza cutter is a great tool for this.

Then roll each piece again length wise to achieve a width of 4” and a length about 24”.

IMG_0428.JPG

Working with one piece at a time, place half the remonce in a line down the center. Fold the top edge over the filling . . . . .

IMG_0429.jpg

Then bring the bottom edge up and over to make a log.

IMG_0431.jpg

Repeat with the second piece then place both pieces on a parchment lined sheet pan in horseshoe shapes with their ends touching each other.

Turns out there’s actually supposed to be a narrow gap down the centers exposing the filling (that’s what I get for not paying attention) but, once the dough had risen, a gap developed during baking so it all worked out okey-dokey.

IMG_0432.jpg

Now grab one end of each horseshoe and bring them toward the other side, crossing each other to form a pretzel. This is one monster of a pastry! Reminds me of some kind of sea snake or something.

IMG_0433.jpg

Egg wash and let proof in a closed space (I often use an overturned clear tote bin for my cover) for about an hour. About 20-25 minutes before the end of the rise heat the oven to 375ºF.

Repeat the egg wash then sprinkle with toasted, coarsely chopped hazelnuts or sliced almonds (or a combo!) and some raw or pearl sugar.

IMG_0437.jpg

Bake for 10 minutes, turn the oven down to 350º and bake an additional 15-20 minutes. Since the thickness at the crossover point is essentially double the rest of the pastry, I tried to be sure that it had baked through. Not necessarily an easy task. I reduced my oven temp by 25º and continued checking every 5 minutes or so, but it’s not really until you cut into something that you know for sure.

Wow - check this out!! Nice and golden, plus you can appreciate the layers and how the top opened up to reveal the filling. Actually quite a messy looking end result, eh? But after all, it’s about sharing the experience and learning from it!

IMG_0438.jpg

Once it had cooled I started carving. While a bit gooey at some points the flavor and flakiness are definitely there, and our taste testing ended with a thumbs up.

IMG_0442.JPG

Slice it up, dust it with some confectioners sugar and share it with all your friends (safely distancing of course). They’ll thank you for it.

IMG_0456.JPG

Wait - I’m not finished yet! As if you haven’t had enough already, I made one more Kringle with a half batch of dough, hoping to make a more petite pretzel without the overlap.

The dough was a bit wider than I would have liked, but I proceeded with the filling and the folding over, leaving the gap in the center.

IMG_0551.jpg
IMG_0552.jpg
IMG_0553.jpg

It was too thick and bulky to form the pretzel I was envisioning, so ultimately it became a circle. Hmmm . . . those ends don’t really want to stay together. Oh dear.

IMG_0554.jpg

Once risen I topped it with sliced almonds and pearl sugar and baked ‘er up.

IMG_0560.JPG

Even though the risen Kringle looked pretty good, my ends did not stay together in the oven. This baby baked into a shape not unlike those leather horse harness collar thingies that you might see on a team of Clydesdales.

IMG_0563.JPG

Not to worry however. This one baked up beautifully with nice flaky layers, delicious flavor and came with the confirmation that I am now an official fan of remonce filling.

IMG_0567.JPG

Quite a project all-in-all. I’m not giving up on this one folks. It’s so important to share the processes, especially the first time around. Remember, if at first you don’t succeed . . . . you know the rest.

More Kringle? You bet! Stay tuned.

Happy baking, stay safe and think of the good days yet to come.

Quadruple chocolate toffee oat bars - a blast from the past

IMG_0543.JPG

This takes me waaaay back to earlier baking days before pastry school had even become a glimmer in my mind. Perhaps a number of you remember the “365 Ways” cookbook series from the early 90s - many different topics on cooking, baking, soups, pasta, salads, chicken, Chinese, Italian and so much more. It turns out they’re still available through various online sources. Steve and I used to have a number of them but over the years as we moved, downsized etc. we either gave away, sold at garage sales or donated them to libraries. But not this one . . . . .

IMG_0526.jpg

My baking bug had only been strengthening and no way was I going to part with this baby. It was published in the fall of 1993, and, although I don’t recall exactly when I purchased it, over the years I made many of the recipes, making notations on when I made them, how they baked (too flat, too gooey), whether I would bake them again (sometimes a big NO), possible additions or substitutions or adjustments for different pan sizes. NOTE: the book is still available on Amazon for $22.99 hardback.

Most of the dates I logged were from 2001 to 2005, the years of our Rutland, Vermont life during which I was moving away from medicine and definitely toward pastry. It made me so happy to bring baked goods in for monthly staff meetings or into the ER when I had to work the night shift (not my fave), just to see the smiles appear. Now that I think about it, that practice went way back to med school days when I’d bake chocolate chip cookies for my roommates and banana bread to take in to the hospital during clinical rotations. My oh my.

As I now page through the book it’s clear that certain sections caught my eye back then: “In the Chips”, a whole chapter devoted to chocolate chip cookies; “Chocolatey Brownies”; “Golden Brownies”; “Other Squares and Bars”. Below are a couple of well marked pages - note especially the “Unbelievably Almondy Almond Bars” notations - yes indeed!

My how my repertoire has changed.

IMG_0589.jpg

I also found a couple of recipes in the “In Great Shape” section that gave me pause and took me back. These are the kinds of cookies that, once the dough is made, are rolled into ball/crescent/pretzel or what-have-you shapes, sometimes flattened/sometimes not and baked. Both “Almond Chews” and “Chocolate Peanut Butter Cookies” were two goodies that I made a number of times and noted on both recipes that the last date I baked them was 9/29/05 with “last shift!” written in. Oh the memories.

As I think of those ER days and my desire (and need) to leave the medical arena, I want to and must offer a HUGE thanks to all those on the front lines right now - my heart goes out to all of you, your patients, your families and friends.

IMG_0590.jpg

Whew! Enough reminiscing. This quadruple chocolate bar is actually one of the recipes from “In the Chips” entitled “Chocolate Chip Dreams”.

When I was pastry chef at Gracie’s in Providence RI from late 2007 to spring 2010 I used to make a chocolate chip cookie that had ground oats in it. So good. Wouldn’t you know it? For the life of me, I could not find said recipe! But wait - this one seemed like it might be close. I thought I’d share the recipe with you this way - much easier than writing it out step by step. Note the date and my scribbles.

As you’ll see, I baked some cookies first (too flat) but then moved on to the bar form - hence the title of this post.

IMG_0593.jpg

My recipe changes include subbing in whole wheat pastry flour for some of the all purpose; toasting 85 g / 1 cup rolled oats, cooling and grinding them before mixing in with the flour, baking powder and baking soda; adding a heaping tablespoon of malted milk powder to the dry ingredients; using all butter (227 g/ 8 oz); for the granulated sugar I used Morena cane sugar which is slightly coarser and more golden than basic white granulated sugar; and last but not least adding 4 different chocolates at the end. This is just one of the ways I’m clearing out my pantry cupboard - yay!

Hmmmm - how’s this for a future project - milk chocolate malted ice cream? Bring it on.

IMG_0513.JPG

For the chocolate portion of the program I coarsely chopped 113 g / 4 ounces each of Guittard’s lever du soleil wafers (my go to chocolate staple), Valrhona’s Jivara milk chocolate (on hand after buying it on sale at Sur La Table some months ago -it was time), Callebaut white chocolate (purchased over the holidays at the grocery store for what reason?) and then finely grated 28 g / 1 ounce of Montezuma’s 100% chocolate with cocoa nibs that I bought at Trader Joe’s for some cookies before Christmas.

IMG_0522.JPG

Once the dough was put together, my first step was scooping cookie dough balls with my 3/4 ounce (~1.5 tablespoons) cookie scoop and spacing them on a parchment lined sheet pan. Since I wanted a trial first, I did one batch on a 1/4 sheet pan and popped the tray into the freezer while heating the oven to 350ºF.

The remainder of the dough balls went onto a 1/2 sheet pan for the freezer and baking at a later date.

IMG_0527.JPG

Bake 11-13 minutes until golden. I tend to take these kinds of cookies out a little sooner than later so as to preserve some softness and chew to complement a bit of crispy edge.

IMG_0531.JPG

While the cookies were tasty and full of chocolate-y, toffee-caramel-y flavors, I was disappointed in the spread and flatness. Probably due to using all butter rather than butter/shortening combo. But I’m an all butter kinda gal, so there. They simply weren’t like those Gracie’s cookies of yore. Rats Charley Brown - I wish I still had that recipe.

So now what? The following day I took the tray of dough balls out of the freezer and let them thaw. I prepped a 1/4 sheet pan (buttered/parchment-lined/buttered and floured the parchment) and pressed all the dough into it in an even layer. Feeling good.

Bake at 350ºF for 20-30 minutes depending on your oven. The edges will rise and set nicely, the top lovely and golden and be sure when you jiggle the pan a bit that the dough doesn’t still have a bit of subtle slosh to it. Once set, cool on a wire rack then cut and enjoy.

This recipe is oh so much better as a bar than a cookie: chewy edges to die for; dense texture, chock full of chocolate that seems to have become one with the dough; just the right hint of coarse oat-y bits; dark brown and Moreno sugars along with the malted milk powder lend that lovely toffee caramel essence.

So here’s the deal. If making the full recipe, press it into a prepped 9x13 pan which should accommodate things very nicely (remember I had baked some cookies first and then put the rest of the dough into a 1/4 sheet pan which is about 9”x12”).

IMG_0536.JPG

These store well covered in the fridge for some days. Steve and I continue to enjoy them when a mini sweet attack hits us.

Stay home, stay safe and happy baking!

IMG_0537.JPG

Toasted coconut pound cake

IMG_0404.jpg

A can of coconut milk, some unsweetened coconut chips, a lone lime in the fridge, a bottle of rum - how about toasted coconut milk pound cake and some toasted coconut ice cream to go with it? Right-o.

IMG_0584.JPG

Some months ago I had purchased a bag of Trader Joe’s unsweetened coconut chips and felt it was high time to adios that bag from my pantry cupboard. Same for a can of Thai Kitchen’s full fat coconut milk that had been destined for . . . . . hmmm, now what was I going to do with that again?

I searched my recipe files for some basic pound cakes and came up with a recipe that felt just right. I made a few of my own substitutions/additions and was ready to go.

IMG_0384.JPG

Here’s what I came up with. There’s coconut milk in both the cake and the glaze, plus I used the rest of the 13.66 fl. oz. can in my ice cream base. Good show - no leftovers!

Ingredients:
Cake
170 g / 3/4 cup unsalted butter, softened
140 g /scant 3/4 cup packed light or dark brown sugar
185 g /scant 1 cup granulated cane sugar
zest of one lime (or two if you have ‘em!)
3/4 cup full fat unsweetened coconut milk (it separates so open the can and mix it up thoroughly before measuring)
260 g / 2 cups flour (I used 60 g whole wheat pastry flour and 200 g all purpose but you can use just all purpose if you like)
3/4 teaspoon baking powder
1/4 teaspoon salt
1/2 cup shredded unsweetened coconut, toasted and cooled (I used coconut chips and simply crushed them up after toasting and cooling)
4 large eggs at room temperature
1 tablespoon vanilla extract + 1/2 tablespoon rum + 1 teaspoon lime juice

Glaze (optional)
42 g / 3 tablespoons unsalted butter
50 g / 1/4 cup brown sugar (light or dark - you decide)
1/2 teaspoon vanilla extract (plus an optional splash of rum)
1/2 cup unsweetened toasted shredded coconut
2 tablespoons coconut milk

For the cake:
Heat oven to 325ºF. Butter and flour a standard loaf pan (9'“x5”). I used my mom’s longer, narrower Mirro “teacake” pan.
Cream butter, sugars, lime zest on medium high for 2-3 minutes until light and fluffy.
Meanwhile blend flour, baking powder, salt and cooled coconut in a separate bowl.
Add eggs to butter/sugar mixture one at a time, scraping down after each addition.
Add vanilla, rum, lime juice and blend.
Add flour mixture alternating with coconut milk, beginning and ending with flour mixture. Blend just until combined.
Transfer into prepared loaf pan. Bake 1 to 1 1/4 hours until nicely browned and a tester inserted in the center comes out clean.
Cool in the pan for 10-15 minutes then turn out onto a wire rack set over a sheet pan. Top with glaze (if using) and cool completely.

IMG_0389.JPG
IMG_0401.JPG

If making the glaze, place the butter and brown sugar in a saucepan over medium heat until the butter has melted and brown sugar dissolved. Stir in toasted coconut, vanilla and coconut milk, let cool slightly then pour/brush over the still warm cake.

IMG_0402.JPG

Once cooled, slice and enjoy.

IMG_0405.JPG

Our first taste was for an afternoon snack accompanying our coffee time. So good.

My baking goals typically focus on a balance of flavors - subtle yet playing well together. “Some” (hint, hint - Steve) say I’m often too timid with flavor additions but in this case - bam! The moisture, the toasted coconut, the caramel-y-ness from the brown sugar and rum (without being overly rummy) are deelish.

I will admit that not much, if any, lime comes through, but at least I used up the one lonely lime that was crying out to me from the fridge. Next time I won’t even bother since the other ingredients do the trick .

As mentioned I used the remainder of my can of coconut milk to make toasted coconut ice cream, replacing the whole milk in the recipe with coconut milk and infusing the dairy with toasted coconut before making the base. Check out this link for more on that, as well as additional ice cream making fun! Summer here we come.

We had a very quiet Easter Sunday at home with a simple evening meal of grilled chicken salad over greens, a side of Bush’s baked beans and some oven fried potato wedges. And for dessert? Toasted coconut pound cake with luscious, creamy coconut ice cream of course!

Once again - stay home, stay safe and happy baking!

IMG_0585.JPG


Chocolate pistachio swirls

IMG_0342.jpg

Time for more fun with croissant dough! Thinking along the lines of pain au chocolat , how about using the classic chocolate batons in smaller pieces to create a chocolate pistachio swirl? Sure thing!

IMG_0318.jpg

I’ve been using Callebaut’s chocolate baking sticks ever since my Paris internship days at Pascal Pinaud’s pâtisserie on rue Monge in the 5th arr. The box in the shop looked EXACTLY like this and here I am 13 years later still buying the same brand. They’re delicious and hold up well during baking - the only problem is that Steve likes to snitch a couple every day for that oh so needed chocolate fix.

IMG_0319.JPG

I love making petite pain au chocolat with my basic croissant dough. Just the right size for a treat along side one’s morning coffee.

IMG_0132.JPG

For this project I took a slightly different approach. I had a full batch of dough on hand but, since I wanted to bake some straight-up all butter croissants for the freezer (croissant aux amandes here we come!), I used a half batch for those and the other for my choco-pistachio swirls.

I made a pistachio version of crème d’amandes by replacing the almond flour with toasted and ground pistachios. Blend butter and sugar, add in the ground pistachios, blend in egg and a bit of flour and you’re ready.

I prepped my muffin tins by buttering and coating with raw sugar.

IMG_0323.JPG

I spent a few minutes plotting the size to which I wanted to roll the dough out as well as the width of each spiral. Turns out I used 1/3 portions (~1 inch wide pieces) of the chocolate batons to create my spirals.

I planned 9 swirls from a half batch of dough. Roll the dough out to ~ 9 inches wide and ~ 12 inches high. Spread a layer of pistachio cream over the dough and place 4 rows of the 1” baton pieces across the dough, spacing the rows about 3 inches apart as seen below.

IMG_0324.JPG

Cut one inch strips, roll them up and tuck them cut side up in the prepared muffin tins.

IMG_0325.jpg
IMG_0327.jpg
IMG_0328.JPG

Cover the pan lightly with plastic wrap and let the spirals rise about 45 minutes. You should appreciate some poof and greater prominence of the laminations.

About 20-30 minutes before baking heat the oven to 375ºF.

IMG_0330.jpg

Bake approximately 20-25 minutes until golden brown and the pistachio cream is set. I typically bake 10 minutes, rotate my pan and, depending on the degree of browning, I may reduce my oven temp to 350ºF to finish the process.

I find that when baking these in a muffin tin, even when the visible portions of the swirls look nicely browned, once I pop them out of the pan there can still be paleness to the sides and bottoms. If so, I transfer the swirls (OUT of the tin) onto a parchment lined sheet pan and put them back in the oven at 325ºF for another 5-10 minutes to finish off the baking and have a nicely golden end result. It’s a bit more fuss but it does the trick.

Another way to approach this is to use buttered 80 mm open rings instead of a muffin tin or simply space the pastries an inch and a half or so apart on a parchment lined sheet pan and bake them unfettered by any type of form. They’ll probably unfurl a bit as they expand but will be “held” by their neighbors.

IMG_0333.JPG

Once cooled (or even when still a bit warm!) enjoy with a fresh cup of coffee or your favorite tea. No fancy plated shot here - just go for it!

Flaky, buttery, pistachio-y with just the right balance of chocolate. Good and good for ya as Steve loves to say!

Stay home and happy baking! We’ll get through this yet folks.

IMG_0339.JPG

Orange olive oil cake

IMG_0377.JPG

My baking focus during these self isolation/shelter-in-place days has revolved around ingredients on hand that I’d like to use up or at least pare down - white whole wheat flour, whole wheat pastry flour, potato flour, semolina, rolled oats, coconut milk, coconut chips, a lime, rum, almond paste, dried cranberries, sesame seeds, chocolate batons, oranges/zest just to name a few.

So far I’ve made chocolate pistachio swirls (stay tuned), coconut pound cake with coconut ice cream (coming up soon), Danish dough destined for almond Kringle (I’ll write about that too), chocolate chunk cookies (whole wheat pastry flour), white whole wheat sandwich bread, cranberry-walnut whole grain bread & rolls (oats, whole wheat flour, sesame seeds), potato dinner rolls (potato flour) and pizza dough (white whole wheat, semolina). Who knows what else I’ll be getting myself into.

Boy oh boy. We, our neighbors and our freezer are all the better for it!

On to the task at hand. Some months ago I purchased Food52’s “Genius Desserts” - chock full of tempting treats, wonderful inspiration and so many recipes to try. This orange olive oil cake is one of them. Credited to NYC restaurant Maialino, part of the Union Square Hospitality Group owned by Danny Meyer (now hit hard by COVID-19 like so many others), the cake was developed by a former pastry chef there, Rachel Binder. The link I’ve given you takes you to the current recipe for said cake by the present pastry chef, Geoffrey Koo - very much like the one printed in “Genius Desserts” with a few tweaks in ingredient portions.

Described as having “a crackling crust” and a center that is close to pudding-like, it’s an easy one to put together. Buuuuutttt . . . . . first let’s take a quick detour.

IMG_0481.JPG

I’ve been meaning to tell you about a local business here in Grand Rapids. It’s called Long Road Distillers and boy do they make some good stuff. They’ve got award winning spirits and plenty of inventive cocktails (usually available at their retail/restaurant space until the current crisis), but we particularly enjoy their amaro and liqueurs. We even took several bottles to the UK as hostess gifts last fall.

They’re available from a number of wine and spirits vendors around town, plus Long Road is offering online ordering/pickup now as well. And to top it all off we recently learned that they’re now contributing to the COVID fight and making hand sanitizer - how cool is that??!!

The Michigan fruit liqueurs are great in Swiss meringue butter cream and basic crème pâtissiére, or joined with vanilla extract in fruity cakes or blended into crème d’amandes for a baked almond fruit tart or cherry-berry version of croissant aux amandes.

The Amaro Pazzo (pazzo means crazy in Italian) is a wonderful coffee essence’d digestif made with Madcap Coffee, another local GR company. And the green walnut Nocino is superb. Hmmm . . . . how about those in buttercream too? Add it to the to-do list!

Time for cake.

IMG_0379.JPG

The recipe calls for Grand Marnier or Cointreau, well known orange liqueurs, but I had neither on hand so decided to use Long Road’s raspberry just because I could.

I’ve been eating a lot of oranges lately and, since I don’t like to waste any citrus, I zest them before sectioning and store the zest packets in my freezer - et voilà, I have orange zest at the ready. Needless to say I have a LOT of orange zest on hand.

IMG_0362.JPG

I’m giving you the recipe as presented in “Genius Desserts” but you can also click on the Maialino link above for the current recipe.

Heat your oven to 350ºF. Butter a 9-inch round, 2-inch deep cake pan, and line the bottom with a round of parchment.

Do your mise and have a medium bowl and a medium-large one on hand. You’ll blend dry ingredients in one and wet in the other.

Dry: In a medium bowl blend 260 g / 2 cups all purpose flour (feel free to sub in 50-60 g or so as whole wheat pastry flour); 350 g / 1.75 cups sugar; 1 1/2 teaspoons kosher salt; 1/2 teaspoon baking soda; 1/2 teaspoon baking powder.

Wet: In a medium-large bowl blend 285 g / 1.33 cups extra virgin olive oil; 300 g / 1.25 cups whole milk; 3 large eggs; 1.5-2 tablespoons orange zest (the more the merrier I always say); 60 g / 1/4 cup freshly squeezed OJ; 1/4 cup liqueur such as Grand Marnier or Cointreau - I used Long Road’s raspberry liqueuer instead.

IMG_0363.jpg

Now blend the dry ingredients into the wet, and scrape into the prepared pan.

Note: My springform seemed a tad askew (I’ve had it a long time), and I could see light coming through along one of the bottom edges. Since this is a pretty wet batter, I wrapped foil around the outside of my pan to insure against leakage. It worked.

IMG_0366.jpg

Bake about an hour until the top is golden, the center set and you have a dry or few crumb-ed tester poked in the middle. I baked mine 10-15 minutes longer than suggested since I could still see a bit of gooey-ness in the top cracks until finally I achieved the tester result I wanted. Moist is good, gooey and under baked isn’t.

IMG_0369.JPG

Cool in the pan about 20-30 minutes then un-mold and cool completely.

Once sliced, the moist nearly pudding like center is clearly appreciated, making one harbor some concern as to whether it baked long enough. But do not fear - all is well.

IMG_0374.JPG

For our initial taste test, I sliced a couple of thin portions to try au naturel. With a tender yet dense crumb, the olive oil and lovely hint of orange offer a completely different experience than a basic butter-made cake. The flavor is hard to describe - at first one questions its uniqueness, but then it starts to grow on you and becomes almost ethereal.

Next I accompanied it with lightly sweetened whipped cream and some fresh berries. What a delicious combo! I must admit that the raspberry liqueur didn’t provide that particular essence to the cake but that’s OK. Come to think of it, I could have drizzled some over the berries and cream!! Duh. Next time.

Of course Steve and I have to ask ourselves “what are we going to do with all of this?”. Well, as it turns out, we were experiencing a particularly beautiful day and some of our neighbors had social distanced themselves into lawn chairs out in the street. At another appropriate distance we set up a small table and brought out a tray of individual servings of cake with berries and cream for all to enjoy. Each person could approach safely, pick up their own and head back to their chair. What a great way to share!

As always, stay home, stay safe, stay healthy.

IMG_0382.JPG